Decorating a Christmas tree is an art form, and incorporating ribbon into your tree design can add a touch of elegance and professionalism to your holiday decor.
Whether you’re a seasoned decorator looking to up your game or a novice hoping to create a stunning centerpiece for your holiday festivities, mastering the art of decorating a Christmas tree professionally with ribbon is worth acquiring.
In this guide, we will explore the steps and techniques that will transform your tree into a festive masterpiece, complete with a beautifully woven ribbon that enhances your holiday season’s overall look and feel.
Whether you prefer a classic, traditional look or a more modern and creative design, these tips will help you achieve the perfect balance of holiday charm and sophistication in your Christmas tree decoration.
Choosing the Right Ribbon
The perfect ribbon can transform a simple decoration into a stunning masterpiece. When decorating a Christmas tree, selecting the right stripe is a fundamental choice that sets the stage for your tree’s overall appearance.
The decision can be exciting and challenging with an array of ribbon options available, each with its unique texture, color, and style.
Different Types of Ribbon
When it comes to selecting the correct ribbon for your Christmas tree, a diverse array of options awaits, each with its distinct characteristics to align with your desired theme and aesthetic:
- Wired Ribbon: Wired ribbon is a popular choice, renowned for its versatility in shaping and maintaining structure. The internal wire edges enable effortless manipulation, making it ideal for crafting cascading bows and intricate ribbon designs.
- Unwired Ribbon: Unlike wired ribbon, unwired ribbon offers a more natural and fluid drape. It gracefully drapes along the branches, creating a softer, less structured appearance, perfect for those seeking a more organic and whimsical tree.
- Mesh Ribbon: Mesh ribbon is a favorite among crafters and tree decorators, available in various materials and patterns. It adds depth and texture to your tree’s overall decor, making it an excellent choice for those who wish to achieve a multi-dimensional and captivating look.
- Satin Ribbon: Satin ribbon exudes timeless elegance with its smooth, glossy surface that beautifully reflects ambient light. It comes in a wide range of colours and widths, making it a versatile choice suitable for many themes, from the classic and opulent to the contemporary and chic.
- Burlap Ribbon: For a rustic and textured aesthetic, burlap ribbon is the go-to option. Its earthy, woven appearance is perfect for country or farmhouse-themed trees, bringing a touch of natural charm to your holiday decor and adding that cozy, down-to-earth vibe.
Considering Width, Texture, and Color
In the realm of Christmas tree ribbon decoration, the decisions involving width, texture, and colour are of paramount importance, as they profoundly impact the overall aesthetics of your tree:
- Width: The width of your ribbon significantly influences your tree’s design and visual impact. Thicker ribbon creates bold and dramatic accents, while narrower ribbon imparts subtler and delicate touches.
- Texture: Texture is another dimension to explore. Whether you opt for smooth, textured, or patterned ribbon, your choice contributes to the overall depth and size of your tree’s decor. The tactile element added by textured stripes can be the difference between a tree that merely looks beautiful and one that feels beautifully decorated.
- Colour: Selecting the right colours for your ribbon is a pivotal choice. Your ribbon should harmonize with your theme or holiday decor colour scheme. Whether staying faithful to traditional red and green or embarking on a unique colour journey, your ribbon’s colour should be carefully considered to align with your overarching vision.
Quantity Needed Based on Tree Size
Determining the quantity of ribbon required is a practical aspect that hinges on your tree’s size and fullness. Here are some general guidelines to help you calculate the amount of ribbon you’ll need:
For a tree in the range of 6 to 7 feet, plan for at least 9 to 12 feet of ribbon. Remember that this estimate should be adjusted based on your tree’s specific dimensions and the density of branches you intend to adorn.
A larger or fuller tree may necessitate a greater quantity of ribbon to achieve your desired decorative effect.
Preparation Before Decorating
Before embarking on the creative journey of decorating your Christmas tree with ribbon, crucial preparatory steps set the stage for a successful and visually appealing result.
Fluffing the Tree: Ensuring Even and Full Branches
Fluffing the branches is one of the first steps in preparing your tree. Gently separate and fan out the branches, ensuring they are even and full. This creates a more robust canvas for ribbon and ornaments and helps your tree look more lush and inviting.
Testing Tree Lights (If Pre-Lit) or Adding Lights Before Ribbons
If your tree comes pre-lit, it’s essential to test the lights to identify any burnt-out bulbs or malfunctioning sections.
Address any issues and ensure the lights work flawlessly before adding ribbons. For unlit trees, this is the stage where you’ll need to add your choice of string lights to the tree.
Lighting is the foundational element of your tree’s decor and sets the mood for the entire design.
Gathering Tools: Scissors, Wire or Clips, and the Chosen Ribbon
Collect all the tools and materials you’ll need for ribbon decoration. This includes scissors for cutting the ribbon, wire or clips to secure the ribbon in place, and the ribbon itself.
Everything ready and within reach ensures a smooth and efficient decorating process, allowing you to focus on your creative vision without interruptions.
Techniques for Applying Ribbon
Applying ribbon to your Christmas tree is an art that can elevate your holiday decor to professional levels.
You can achieve a beautifully adorned tree that captivates and inspires with the proper techniques. This guide delves into the creative methods and expert tips to help you master the art of applying ribbon to your tree.
Whether you’re aiming for a classic, whimsical, or contemporary look, these techniques will guide you in achieving a polished and visually captivating result that will leave your guests in awe.
a. Cascading or Waterfall Effect
Creating a cascading or waterfall effect with ribbon is a popular and elegant technique that adds a sense of movement and grace to your Christmas tree decoration.
To achieve this effect, you’ll start from the top and allow the ribbon to cascade downward, imitating the flow of a waterfall gracefully. Here’s how to execute this technique effectively:
- Spacing: Begin by selecting your desired ribbon and unrolling it. Then, hold the ribbon at the top of the tree, securing it to the tree to create a cascading effect. Leave some space between each cascade to maintain an even and balanced appearance.
- Twisting: As you continue down the tree, twist the ribbon gently as you allow it to fall. The twisting action adds dimension and visual interest to your tree. You can experiment with different convoluted levels to achieve various effects, from a subtle twist for a refined look to more pronounced twists for a playful or whimsical appearance.
- Securing: Secure the ribbon in place periodically with tree branches, florist wire, or ornament hooks. This ensures the cascading effect remains in the desired position and doesn’t shift or become tangled.
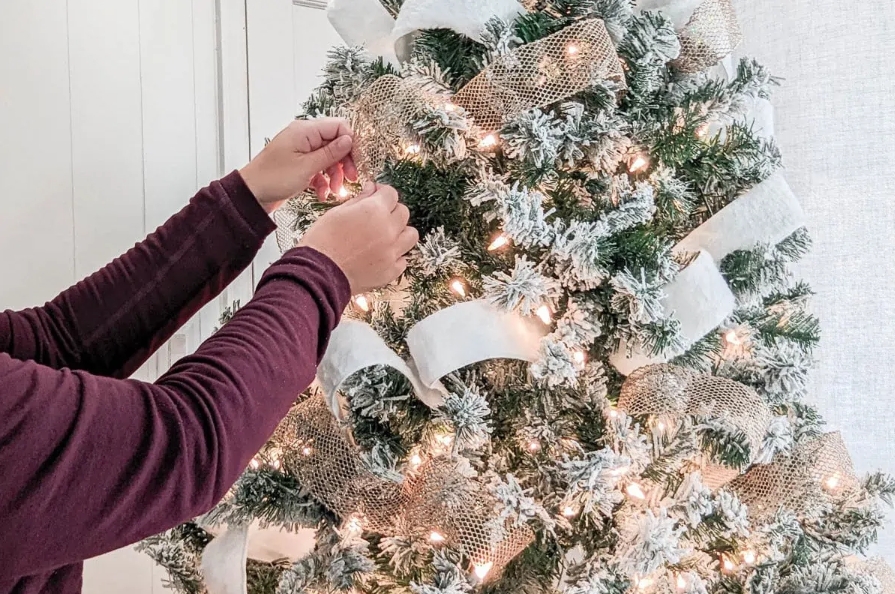
b. Ribbon Wraps
The technique of ribbon wraps involves wrapping the ribbon horizontally or diagonally around the Christmas tree, resulting in a harmonious and well-balanced appearance. Here’s how to achieve this technique with finesse:
Horizontal or Diagonal Wrapping
Choose whether to wrap the ribbon horizontally, encircling the tree in a continuous band, or diagonally, creating an elegant slant across the tree’s branches. The choice between these two styles can significantly impact the overall look of your tree.
Ensuring Even Spacing
Maintain even spacing between each wrap around the tree. Consistency is critical to achieving a polished and balanced appearance.
This spacing will vary depending on your personal preference and the size of your tree. Generally, aim for wraps that are a few inches apart for a well-distributed look.
Gentle Looping:
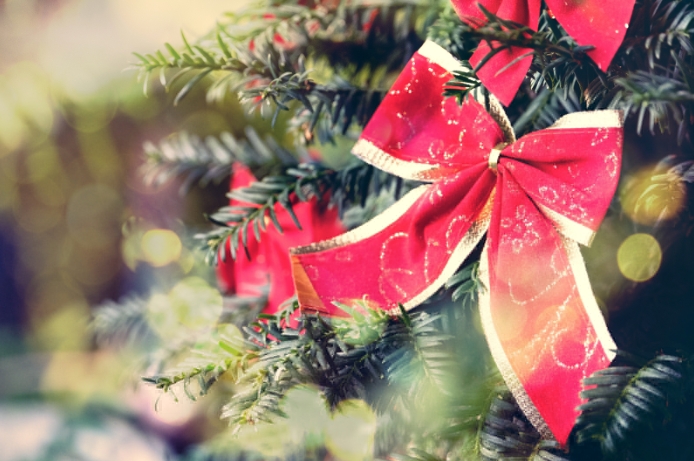
c. Bow Accents
Adding bows to your Christmas tree is a delightful and versatile technique that brings a touch of elegance and festivity to your holiday decor.
Bows can be created in various sizes and strategically placed on the tree to achieve visual balance. Here’s how to master this decorative technique:
Creating Bows of Various Sizes
Begin by crafting or selecting bows in different sizes. Bows can range from small and delicate to larger, more elaborate ones. By diversifying the dimensions, you can add depth and visual interest to your tree.
Strategic Placement for Visual Balance
Place the bows on the tree strategically to ensure visual balance. Distribute them evenly throughout the tree to create a harmonious look.
Bows can be attached to tree branches, tucked within the branches, or even hung on the tips of branches, depending on your preferred aesthetic.
Mixing and Matching
Experiment with various bow styles, colors, and textures to achieve a visually pleasing contrast or a coordinated look. Mixing and matching bows can create a captivating and personalized tree design.
d. Draping or Tenting
The draping or tenting technique is a creative way to use ribbon on your Christmas tree, adding depth and dimension to your tree’s decor.
To achieve this method, you’ll drape ribbon between branches in a tent-like fashion, creating a visually exciting and layered effect. Here’s how to master this technique:
Draping Ribbon Between Branches
Begin by selecting your desired ribbon and gently draping it between tree branches. Allow the ribbon to form natural loops and cascades, creating a tent-like appearance.
This technique works best with ribbon that is pliable and easy to manipulate.
Combining with Other Ornaments
Enhance the draped ribbon’s effect by strategically combining it with other ornaments. Place ornaments within and around the draped ribbon to add depth and layering.
This combination of ribbon and embellishments can create a captivating and multi-dimensional look for your tree.
Incorporating Other Ornaments
While ribbon plays a pivotal role in Christmas tree decoration, the synergy with other ornaments truly brings your tree to life.
This section delves into the art of incorporating other ornaments, offering insights into combining baubles, figurines, and keepsakes to create a tree that tells a story and resonates with your holiday spirit.
Choosing ornaments that complement the ribbon’s color and texture
Harmonizing the colour and texture of your decorations with the chosen ribbon is an essential aspect of creating a visually cohesive and appealing Christmas tree. Here’s how to master the art of selecting ornaments that complement your ribbon:
1. Match the Color Palette
Begin by selecting ornaments that align with the color scheme of your ribbon. Whether you’re going for a traditional red and green combination, a contemporary monochromatic theme, or a unique color palette, ensure that your ornaments are in sync with the chosen colors.
2. Texture and Material Coordination
Consider the texture and material of your ornaments. For example, if you’ve opted for a satin ribbon with a smooth and shiny finish, choose decorations with a similar glossy texture.
Conversely, if you’re using a burlap ribbon with a rustic, textured appearance, select ornaments made from natural materials like wood or fabric to maintain a cohesive look.
3. Balance and Contrast
Achieving a balance between complementing and contrasting elements is essential. While coordinating colors and textures is crucial, some contrast can add visual interest.
For instance, if your ribbon is highly textured, consider incorporating smooth, metallic ornaments to create a striking contrast.
4. Layering and Depth
Experiment with layering ornaments around the ribbon. Place some ornaments closer to the ribbon and others deeper within the branches to create depth and dimension.
This layering technique enhances the overall visual appeal of your tree.
Balancing large and small ornaments
Achieving a harmonious and visually appealing Christmas tree design involves balancing large and small ornaments.
This balance ensures that your tree looks well-proportioned and captures the essence of your chosen theme. Here’s how to master this essential aspect of tree decoration:
1. Large Ornaments as Focal Points
Start by strategically placing larger ornaments as focal points on your tree. These ornaments can serve as eye-catching elements that draw attention. Position them evenly around the tree to create a balanced distribution.
2. Fill Gaps with Smaller Ornaments
Use more miniature ornaments to fill gaps and spaces between the branches. These more miniature ornaments add depth and dimension to your tree while creating a cohesive and polished appearance.
3. Layering and Gradation
Experiment with layering large and small ornaments to create a sense of depth. Place some large ornaments closer to the tips of branches and intersperse more miniature ornaments deeper within the tree.
This gradation adds visual interest and ensures your tree has a dynamic and three-dimensional look.
4. Consider the Theme
The choice of large and small ornaments should align with your chosen theme. For traditional themes, more giant glass baubles may work beautifully, while contemporary or whimsical pieces may benefit from more miniature, playful ornaments. Be sure to maintain a consistent theme throughout your tree’s design.
5. Balance by Quantity
Achieving balance doesn’t necessarily mean an equal number of large and small ornaments. It’s about creating a visually pleasing distribution. If you have more small ornaments, use them generously to maintain equilibrium.
Layering: adding ribbon first, then larger ornaments, and finishing with smaller ones
Layering your Christmas tree decoration involves meticulously arranging ribbons and embellishments to create depth, dimension, and a harmonious aesthetic.
This sophisticated technique allows you to craft a tree that captures the festive spirit and reflects your unique style. Here’s an in-depth look at the art of layering your tree:
1. Start with Ribbon
The foundation of your layered design begins with ribbon. Apply the ribbon throughout the tree depending on your chosen ribbon technique, such as cascading, wrapping, or draping. Ribbon is a unifying element, providing a cohesive backdrop for future ornaments.
2. Add Larger Ornaments
After securing the ribbon, it’s time to introduce more giant ornaments. These ornaments play a pivotal role as focal points.
Strategically place them around the tree, considering even spacing. Position these larger ornaments on branches closer to the tree’s outer tips to create a visual depth effect.
3. Finish with Smaller Ornaments
The layering process continues with more miniature ornaments. These serve to fill in the spaces between the branches and larger ornaments.
They add detail and intricacy to your tree’s design, creating a balanced and captivating look. Ensure an even distribution of more miniature ornaments, and don’t hesitate to mix sizes for a dynamic effect.
4. Consider Color and Theme
Throughout the layering process, always keep your chosen color scheme and theme in mind.
The ribbon and, more importantly, miniature ornaments should harmonize, reflecting a consistent theme that resonates with your holiday vision.
This cohesiveness creates a polished and visually pleasing result.
5. Adjust as Needed
Step back from your tree to assess its overall appearance as you progress. Make any necessary adjustments to achieve the desired balance and visual appeal.
Be prepared to move ornaments or ribbon to ensure your tree looks well-layered and thoughtfully designed.
Caring for and Storing Your Ribbon
Proper care and storage are critical when it comes to preserving the beauty and longevity of your cherished holiday ribbon.
This section explores essential techniques for maintaining your ribbon’s vibrancy and texture, ensuring it remains in prime condition for seasons to come.
Discover valuable tips on how to protect your ribbon from wear and tear, humidity, and fading.
Gently removing and rolling up ribbons after the holiday season
To prolong the life and quality of your holiday ribbon, proper removal and storage are essential. Here’s how to gently and effectively handle your ribbons at the end of the holiday season:
- Careful Removal: Begin by gently and carefully removing the ribbon from your tree or decorations. Avoid yanking or tearing, as this can damage the ribbon’s fabric or design. Patience is key.
- Rolling Technique: Roll the ribbon gently, rather than folding or crumpling it after removal. Rolling helps prevent creases and wrinkles, ensuring your ribbon remains in excellent condition for subsequent use.
Storing in a cool, dry place to maintain color and shape
Proper storage is paramount for preserving your ribbon’s color and shape. Here’s how to store your ribbon effectively:
- Cool and Dry Environment: Store your rolled ribbons in a cool, dry place. Avoid areas with high humidity, as moisture can cause colors to bleed or fabric to deteriorate.
- Sealed Containers: Consider placing your rolled ribbons in sealable plastic bags or containers to protect them from dust and potential damage. This extra layer of protection can help maintain the vibrancy of your ribbon.
Tips for refreshing ribbons for the next use
To ensure your ribbons look their best when you’re ready to use them again, follow these tips for refreshing your ribbons:
- Gentle Ironing: If your ribbon has developed minor creases or wrinkles, you can use a low-heat iron to press them out gently. Place a cloth between the iron and the ribbon to protect the fabric.
- Steam Method: Another way to remove creases is to use a garment steamer. Hold the ribbon taut and allow the steam to relax the fabric, gradually smoothing any imperfections.
- Spot Cleaning: For any stains or soiling, consider spot cleaning with a mild detergent or fabric cleaner. Test the cleaning product on a small, inconspicuous area first to ensure it doesn’t affect the ribbon’s color or texture.
Safety Tips
When decorating your Christmas tree with ribbons and ornaments, it’s crucial to prioritize safety to enjoy the holiday season without worry. Here are essential safety tips to keep in mind:
1. Keeping Ribbons Away from Tree Lights and Hot Spots
Position ribbons on your tree carefully, keeping them away from tree lights and potential hot spots. Ribbons are flammable, and their proximity to heat sources can pose a fire hazard. Maintain a safe distance to prevent accidents.
2. Ensuring Tree Stability After Adding Decorations
Once you’ve adorned your tree with ribbons and ornaments, check for tree stability. Ensure that the added weight of decorations doesn’t compromise the tree’s balance. A securely anchored tree is less likely to tip over, reducing the risk of accidents and damage to your holiday display.
Conclusion
In the delightful journey of decorating your Christmas tree with ribbons and ornaments, you’ve harnessed the art of creating a personalized and captivating tree design.
From selecting the perfect ribbon and understanding the nuances of various techniques to skillfully layering ornaments and ensuring safety at every step, your tree is now a symbol of your creativity and holiday spirit.
By mastering the art of caring for and storing your ribbons, you’re ready to relive the magic of this season for years to come.
As your tree takes center stage in your home, may it radiate warmth and joy, creating cherished memories and fostering a spirit of togetherness in the festive air.