Halloween is a time of year when creativity and imagination run wild, and one of the most enjoyable and iconic aspects of this spooky holiday is creating your own Halloween decorations.
Among the countless ways to celebrate the season, making a dummy for Halloween is a time-honored tradition that allows you to add a chillingly lifelike element to your haunted house, graveyard, or spooky scene.
Whether you’re looking to scare trick-or-treaters, host a memorable Halloween party, or simply enjoy the thrill of crafting your eerie prop, this guide will walk you through the right steps.
Further, it will help you create a convincing and spine-tingling Halloween dummy that will leave everyone talking long after the holiday has passed.
So, gather your materials, summon your inner artist, and prepare to embark on a hauntingly fun journey into the world of DIY Halloween decorations.
Materials Needed
To create a Halloween dummy that will send shivers down spines, you’ll need a combination of basic and optional materials for the foundation to enhance the spooky effect. Here’s a comprehensive list of what you’ll need:
Basic Materials:
- Old Clothes: Gather a set of old clothing items that you don’t mind sacrificing for your dummy’s outfit. These should include pants, a shirt, and possibly a jacket or costume.
- Stuffing Material: Choose your preferred stuffing material to give your dummy a lifelike form.
- Gloves: A pair of gloves will serve as the hands of your dummy. These can be old or thrifted gloves that match the character you’re creating.
- Shoes: Find a pair of old shoes that match the style you want for your dummy. These will be essential for completing the look.
- Mask or Old Pillowcase: For the head, you can either use a store-bought mask that suits your character’s theme or repurpose an old pillowcase and paint or decorate it to resemble a spooky face.
Optional Materials for Enhanced Effects:
- Fake Blood: Add a gruesome touch to your dummy by applying fake blood strategically, such as around the mouth or on the clothing.
- Glow-in-the-Dark Paint: Create an eerie, otherworldly ambiance by using glow-in-the-dark paint on specific parts of your dummy, like the eyes or clothing.
- LED Lights: Incorporate LED lights into the head or body of your dummy to give it an eerie, glowing effect. This works well for ghostly or supernatural characters.
- Props and Accessories: Depending on your theme, you may want to include additional props and accessories, such as a plastic sword for a zombie slayer or a broomstick for a witch.
- Sound Effects: For an immersive experience, consider adding spooky sound effects, like creaking doors or haunting whispers, using a small speaker or smartphone.
- Fog Machine: If you want to take your Halloween display to the next level, a fog machine can create an eerie atmosphere that enhances the overall effect of your dummy.
Choosing the Right Spot
Selecting the perfect location for your Halloween dummy is a crucial step in ensuring that it has the desired impact and contributes to the overall ambiance of your Halloween display. Here are some tips and considerations for choosing the ideal spot:
1. Consider Visibility
One of the primary objectives of your Halloween dummy is to create a scare or a spooky focal point.
Therefore, it’s essential to choose a location where passersby will easily see and notice it, whether they are approaching your home or just walking by. Front yards, front porches, and windows facing the street are often excellent choices.
These areas provide maximum visibility and are likely to elicit surprised reactions from those who encounter your creation.
2. Lighting Matters
Lighting can significantly enhance the effect of your Halloween dummy. Consider the lighting conditions in the chosen spot.
Place your dummy in an area where you can strategically use spotlights, string lights, or other lighting effects to create a spooky ambiance.
If your dummy incorporates LED lights, ensure there’s a power source nearby to make the most of the eerie glow.
3. Safety First
Safety is of paramount importance when setting up your Halloween decorations.
To prevent accidents and potential injuries, ensure that your dummy is not obstructing any pathways or becoming a tripping hazard.
Keep it away from stairs, sidewalks, and other high-traffic areas where people might accidentally stumble over it. Always prioritize the safety of those visiting your home.
4. Weather Considerations
Depending on your location and the time of year, weather conditions can vary. Rain and wind can damage your Halloween dummy and decorations.
Therefore, placing your dummy in an area that offers protection from the elements is a good idea.
Position it under a covered area or consider using weather-resistant materials if you anticipate inclement weather.
5. Theme and Atmosphere
Think about the theme and overall atmosphere you want to create with your Halloween display. The choice of location should align with your theme.
For instance, a front porch might be ideal for a haunted house theme, while a dummy placed in the yard can work well for a graveyard or outdoor scene.
The location should complement your Halloween decor and contribute to the storytelling element of your display.
6. Interactive Placement
If you want your Halloween dummy to interact with trick-or-treaters or guests, strategically position it.
Placing it near the front door or along the path to your doorstep can create memorable and interactive scares. This can add an extra layer of fun to your Halloween celebration.
7. Consider Neighbors and Regulations
While Halloween decorations are generally accepted and celebrated, it’s essential to be considerate of your neighbors.
Ensure that your display is not overly frightening or disturbing, as this can lead to complaints.
Additionally, check local regulations or any rules your homeowners’ association sets regarding Halloween decorations.
8. Power Source Planning
If you’re incorporating electronic components such as LED lights, sound effects, or animatronics, plan for a nearby power source or use battery-powered options.
Secure extension cords to prevent tripping hazards and ensure everything functions smoothly throughout the Halloween festivities.
Creating the Dummy’s Body
Creating a Halloween dummy with a realistic and proportionate body is crucial for making it both convincing and spine-tingling.
Here’s a step-by-step guide to filling the clothes with stuffing material to bring your dummy to life while keeping proportions in mind.
1. Prepare the Clothing
Begin by dressing your dummy in the selected old clothes. Make sure these clothes fit the character or theme you have in mind and that they are clean and free of any stains or odors.
The clothing serves as the outer shell of your dummy, so it should match the character’s appearance.
2. Start with the Torso
Start filling the shirt and any additional layers you’ve chosen with your selected stuffing material for the torso.
Options include newspapers, straws, foam, or pillow stuffing. Begin by filling the chest area and down to the abdomen.
To create a more natural shape, consider using different materials for different torso sections. For instance, use newspapers for a flat chest area and pillow stuffing for a rounder belly.
3. Shape the Arms
Create realistic arms by stuffing the shirt sleeves with your chosen material. Pay attention to achieving a natural arm shape, considering the character’s posture and positioning.
Ensure even filling to avoid lumps or irregularities. Bend the arms at the elbows to give them a lifelike appearance.
4. Fill the Legs
For the legs, stuff the pants with the same stuffing material used for the torso and arms. Start with the upper thighs and work your way down to the feet.
To add more realism, consider bending the knees slightly or creating a sitting or standing pose, depending on your character or theme.
5. Shape and Proportion
Maintain careful attention to the overall proportions of your dummy. Consider factors like height, body shape, and posture that best match your character or theme.
You can use additional clothing or padding, such as belts or scarves, to adjust proportions and achieve the desired look.
For example, cinching in the waist with a belt or stuffing socks into the shirt sleeves can create more defined arms.
6. Secure the Fillings
To prevent shifting or sagging, ensure that the stuffing materials are securely in place within the clothing.
You can use safety pins or stitching to hold everything in position.
By carefully following these steps, you can create a Halloween dummy with a realistic and proportionate body that adds authenticity to your spooky display.
Designing the Dummy’s Head
Designing the head of your Halloween dummy is a critical step in giving it a character and personality that suits your spooky theme.
Whether you’re using a mask or an old pillowcase, here’s how to create a convincing and eerie dummy head:
1. Select the Base
Begin by choosing the base for your dummy’s head. You can opt for a mask or an old pillowcase, depending on the look you want.
Masks can offer pre-made character faces, while pillowcases provide a canvas for your creativity.
2. Stuff the Head
Once you have your base, it’s time to give it some volume. Fill the selected base with appropriate stuffing materials such as crumpled newspaper, pillow stuffing, or foam.
This will create a three-dimensional head shape, providing substance to your dummy’s appearance.
3. Add Facial Features
This step allows you to give your dummy’s face character and personality. Use markers, paint, or sewn-on buttons to create facial features that align with your chosen character or theme.
Add details like eye sockets, a sinister grin, or dark shadows to achieve that eerie effect.
4. Optional: Wig or Hat
Consider adding a wig or hat to further enhance your dummy’s appearance.
Wigs can drastically alter the head’s overall look, while hats are great for characters like witches, wizards, or scarecrows.
Choose accessories that complement your character’s style and securely attach them to the head.
5. Secure the Head
Ensuring the head is securely attached to the body or clothing is vital.
Use a sturdy support structure or secure attachments to prevent the head from shifting or falling off during your Halloween display.
This step helps maintain the overall integrity of your creation.
6. Final Touches
Before finalizing your dummy’s head, take a step back and evaluate its appearance from different angles.
This assessment will help you make any necessary adjustments to achieve the desired spooky and realistic look you envisioned.
Remember that attention to detail can significantly enhance the impact of your Halloween dummy.
Positioning the Dummy
Positioning your Halloween dummy in a creative and attention-grabbing manner is essential for maximizing its spooky impact. Here are some ideas for poses and tips for securing the dummy in place:
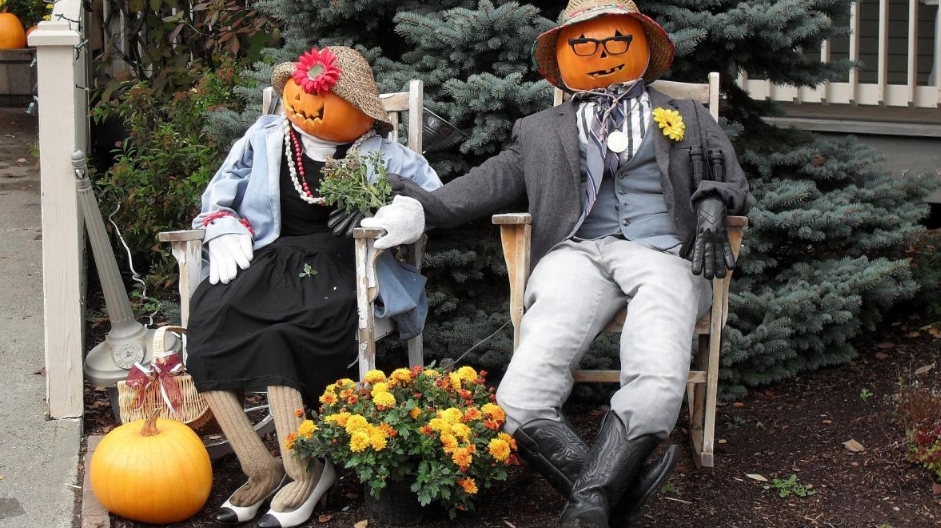
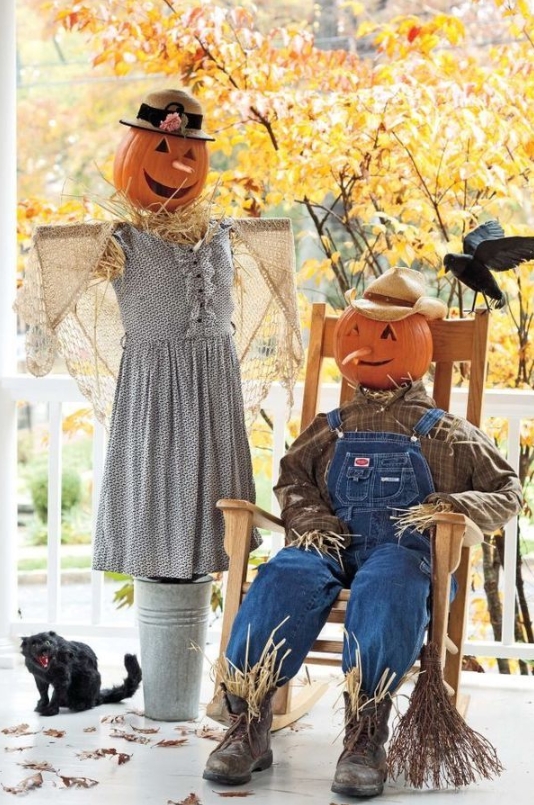
- Creative Poses: When positioning your Halloween dummy, consider various poses like having it sit on a porch swing for a relaxed yet eerie atmosphere, lie on the ground for a spooky appearance, or hang it from a tree (in a respectful manner) to create a haunting effect.
- Secure Positioning: Use sturdy ropes, chains, or stakes to anchor your dummy securely in its chosen pose. Regularly inspect and adjust its stability to prevent it from falling or shifting. Ensure it doesn’t block walkways and keep it away from fire hazards to prioritize safety.
Adding Finishing Touches
Halloween dummy from ordinary to spine-chilling. These finishing touches include adding fake blood for a gruesome effect, incorporating glow-in-the-dark elements or LED lights for nighttime visibility, and including props that enhance the theme and character of your display.
Drizzling Fake Blood
Consider drizzling fake blood strategically to add an extra level of spookiness to your Halloween dummy.
Apply the fake blood to areas like the mouth, clothing, or hands to create a chilling and realistic effect.
This gruesome detail can make your dummy appear even more terrifying and enhance its overall impact on your Halloween display.
Using Glow-in-the-Dark Paint or LED Lights
Consider incorporating glow-in-the-dark paint or LED lights to make your Halloween dummy more captivating during the nighttime hours.
Apply glow-in-the-dark paint to specific areas, such as the eyes or clothing, to make them stand out when the lights are dimmed.
Adding Props
To further elevate the theme and character of your Halloween dummy, consider including props that suit the chosen character or scene.
For instance, you can add a broomstick for a witch, a lantern for a spooky guide, or a fake weapon for a menacing touch.
Safety Precautions
Ensuring safety when creating and displaying your Halloween dummy is of paramount importance to prevent accidents and ensure a fun and worry-free Halloween experience. Here are some essential safety precautions to keep in mind:
- Fire Safety: Avoid placing your Halloween dummy or decorations near open flames, candles, or any other heat sources. Costume materials, props, and decorations can be highly flammable.
- Tripping Hazards: Ensure that your dummy’s placement does not obstruct walkways or become a tripping hazard for visitors, especially in low-light conditions during the evening.
- Weather Considerations: Be aware of weather conditions, such as rain and wind, which can affect the stability and safety of your Halloween display. Make adjustments as necessary to prevent damage or accidents.
- Electrical Safety: If you’re using electronic components like LED lights or sound effects, ensure that all wiring is safely hidden, protected from moisture, and not exposed to potential tampering. Use outdoor-rated extension cords if necessary.
- Child Safety: If you’re expecting young trick-or-treaters, ensure that your Halloween decorations, including the dummy, are age-appropriate and not overly frightening for children.
Maintenance and Storage
Maintaining and properly storing your Halloween dummy and decorations is crucial for their longevity and continued use in future Halloween celebrations.
Here are some tips for maintenance and storage:
Maintenance:
- Regular Inspections: After each use, inspect your Halloween dummy and decorations for any damage or wear and tear. Address any issues promptly to prevent further deterioration.
- Cleaning: Remove any dirt, dust, or fake blood from your dummy and props. Depending on the materials used, you can gently wipe them down with a damp cloth or use a small handheld vacuum cleaner.
- Repairs: Repair any minor damage, such as loose seams or detached parts. Ensure that all props and features are secure and functional.
- Electrical Components: If your display includes electronic components like LED lights or sound effects, check the wiring for damage and replace any faulty parts. Store electrical components indoors to protect them from moisture.
- Touch-Ups: If your dummy’s features, such as facial details or clothing, have faded or worn, consider touch-up paint or repairs to maintain its appearance.
Storage:
- Clean and Dry: Before storing your Halloween dummy, ensure it’s clean and completely dry. Moisture can cause mold and damage over time.
- Disassemble if Possible: If your dummy can be disassembled, storing it in smaller pieces is often easier. This can also help prevent damage during storage.
- Use Proper Containers: Store your Halloween decorations in sturdy, airtight containers or plastic bins with lids. These containers protect your items from dust, pests, and moisture. Label the containers for easy identification in future years.
- Stack Strategically: Stack multiple containers with the heaviest and sturdiest items at the bottom to prevent crushing or damage to more delicate decorations.
- Climate-Controlled Storage: Whenever possible, store your decorations in a climate-controlled area of your home, such as a basement or closet. Extreme temperature fluctuations can damage materials like foam or fabric.
Conclusion
Creating a Halloween dummy can be a fun and creative way to add a spooky touch to your Halloween decor.
From designing the body and head to positioning it effectively and adding finishing touches, this process lets your imagination run wild.
However, it’s crucial to prioritize safety when setting up your display and to maintain and store your decorations for future use properly.