Engaging in the age-old practice of decorating Easter eggs is an artistic pursuit and a celebration that spans generations, linking past and present through culture, signs, and joyfulness.
This tradition goes back to ancient civilizations, where eggs were decorated in many cultures as a sign of rebirth, fertility, and the spring season.
It has assumed numerous forms ranging from the intricacy of allure to the color that blazes with an intensity of tales craved by many different cultures.
This article acts as your artistic manual to turn simple eggs into a masterpiece of art, interlacing tradition and style.
Easter Egg Decoration Ideas
Escape into Easter wonderland as we delve into novel egg decorating ideas that will enhance your holiday celebration.
Unlock your creativity, and go through creative egg décor ideas that will boost the quality of your Easter.
1. Multicolor Glitter Eggs:
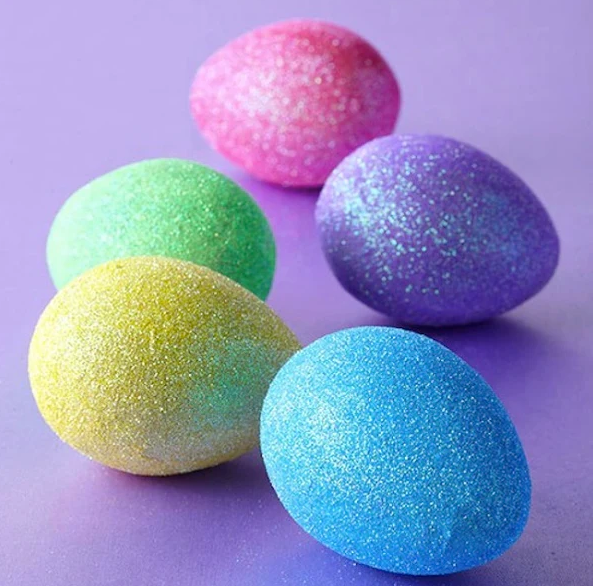
Enter the glorious world of multicolor holographic eggs and watch each egg transform into a dazzling creation.
Let your creativity run free by applying different shades of glitter to create an amazing kaleidoscope pattern.
To learn how to create your own Multicolor Glitter Eggs, follow this tutorial here.
2. Twine Eggs:
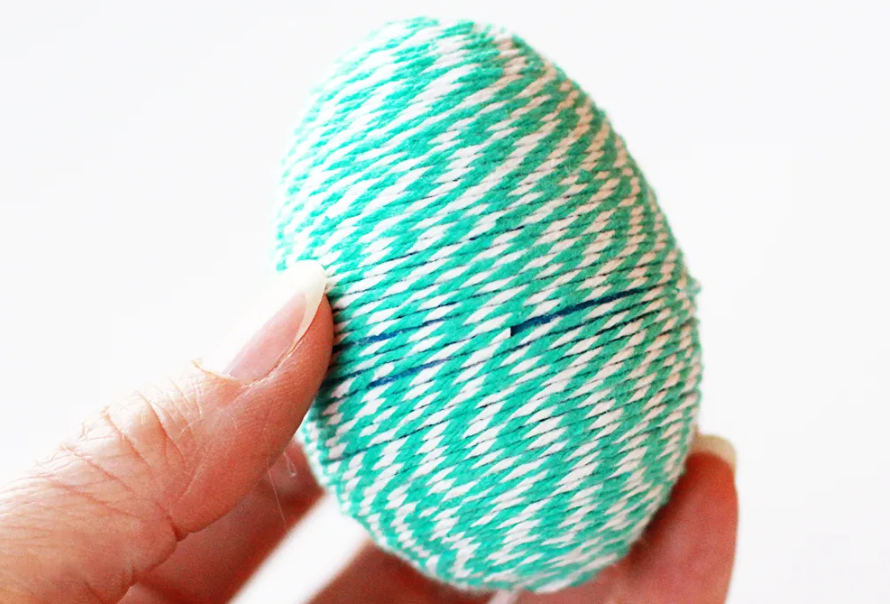
Wrapping eggs in twine is simple, but this subtle yet extravagant idea provides additional texture and warmth for your decoration.
Get creative with twines with various colors and designs so that the Easter decor matches your aesthetics perfectly.
To learn how to make Twine Eggs yourself, see this tutorial.
3. Watercolor Tattoo Easter Eggs:
Set your artistic freedom free when smoothing hues across the eggshell to deliver an ethereal watercolor appearance.
Every shell becomes your canvas, where mysterious patterns supported by fine details are painted to give an impression of watercolor artwork.
Comprehensive steps to make your own Watercolor Tattoo Easter Eggs can be found here.
4. Felt Eggs:
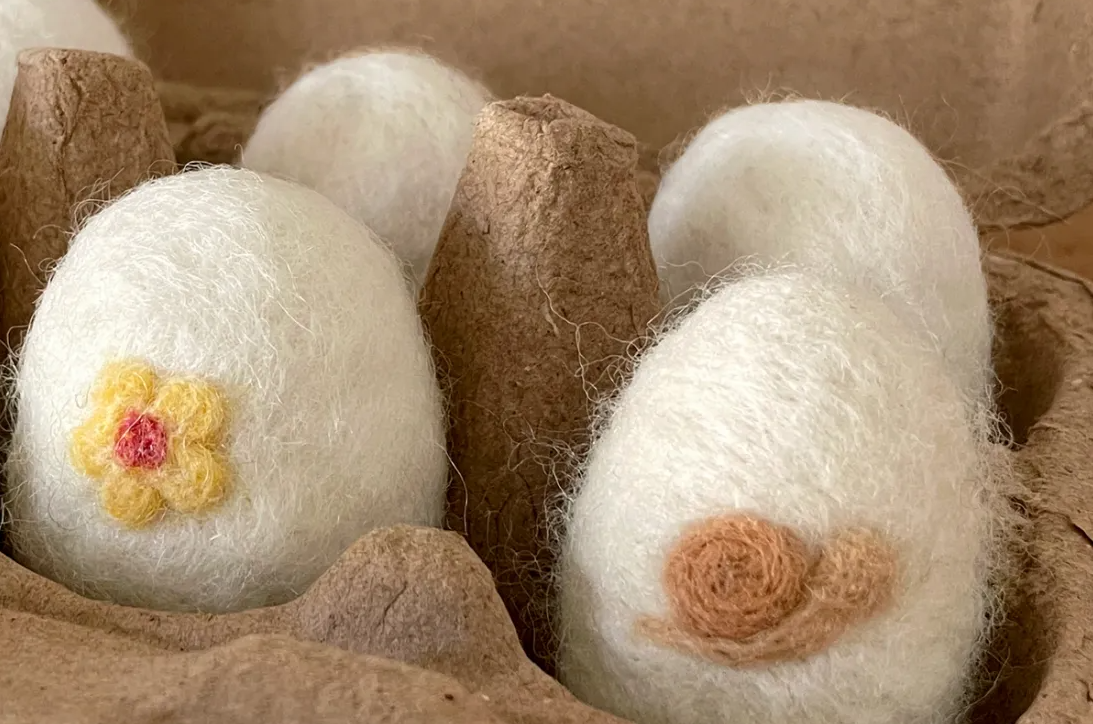
Enjoy the softness of felt as you dive into a universe shaped by Easter eggs covered with goblin fur, which offers infinite variations, from romantic or chaste pastels to dotted contrasts.
Felt eggs bring a double dose of pleasure in terms of their visual appeal and physical texture since it is not only these decorative substances that are felt, but they can be playfully touched.
See here for instructions on how to create your own Felt Eggs.
5. Tassel Eggs:
Add some playful bohemian accents with tassel-decorated eggs. The egg top is decorated with tassels of different colors to have a delicious vibe.
Combine tassel colors to suit your larger Easter theme, and enjoy as these vibrantly cheerful additions usher color green into your celebratory decor.
For more on creating your own Tassel Eggs, see this tutorial here.
6. Leaf-wrapped eggs:
Feel the connection with nature by painting leaves on eggs, placing them well, and fastening them with a fine netting or twine.
This creates a wonderful combination of organic textures and seasonal patterns, inviting the outside in for an earthy Easter.
Click here for the tutorial to learn how to make your own Leaf-Wrapped Eggs.
7. Celebrity Easter Eggs:
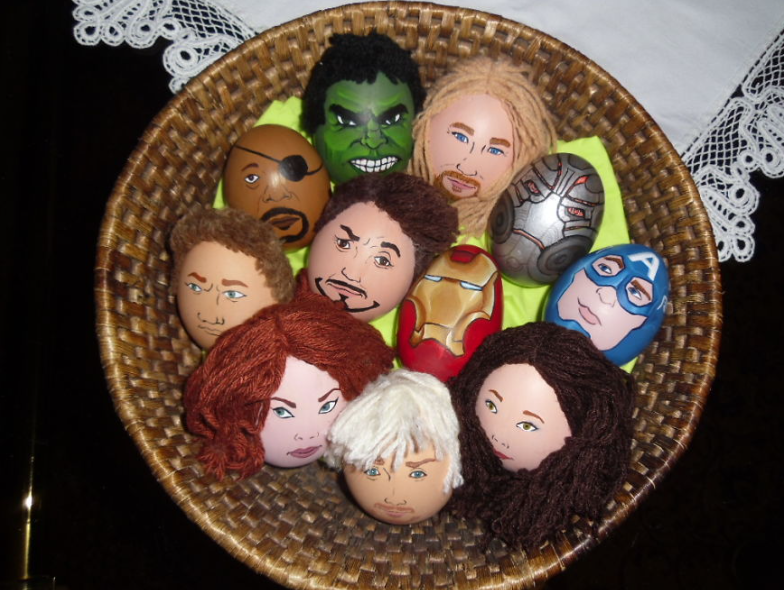
Recreate a little bit of Hollywood feel into your Easter party with Celebrity Easter Eggs. Design your eggshells with famous faces or beloved characters.
These celebrity-inspired eggs bring a star-studded ambiance to your Easter décor regardless of whether it is an iconic actor, pop culture superstar, or fictional character.
To learn more about making Celebrity Easter Eggs, please see this tutorial.
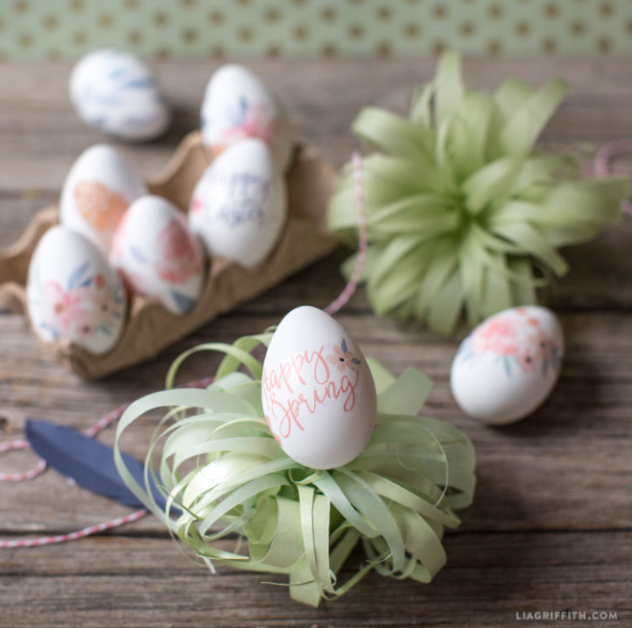
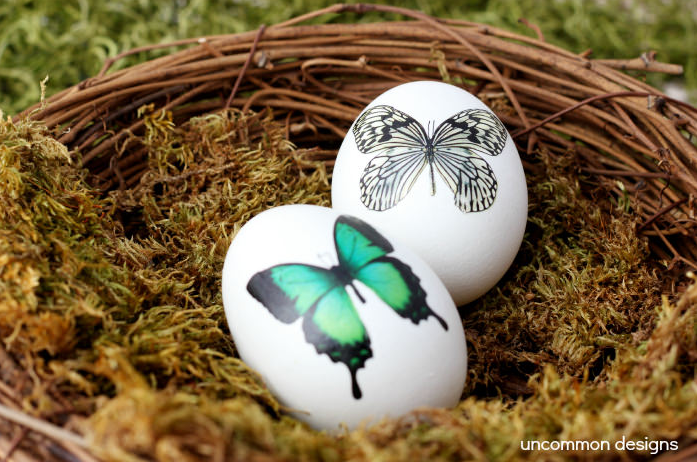
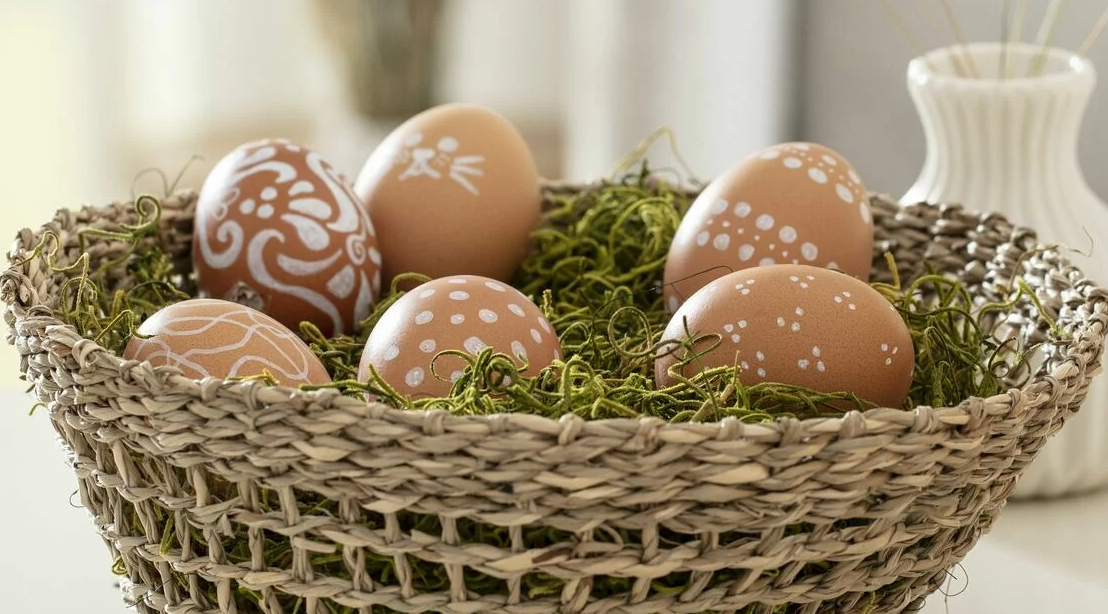
8. Nesting Easter Eggs:
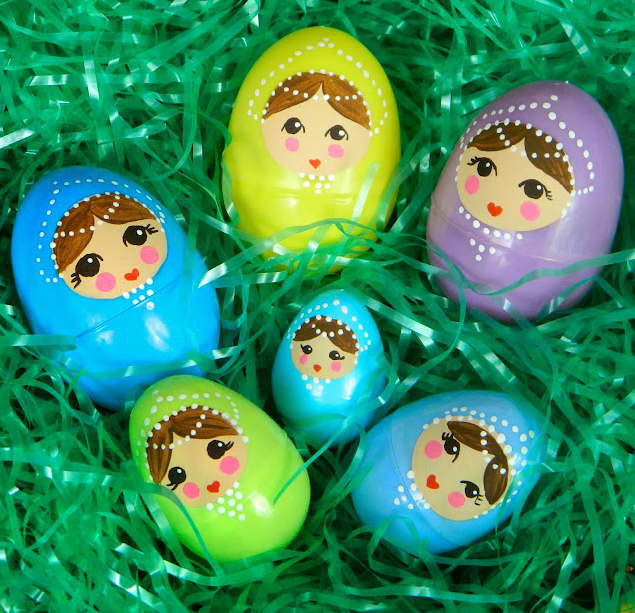
Nesting Easter Eggs is an adorable tribute to nature that imitates the snug comfort of a bird’s nest decorated with twigs, feathers, and small embellishments.
This style is both rustic and quirky, with a vintage twist that reflects the season and turns each egg into an artistic miniature reflecting nature itself.
Detailed instructions on how to make your own Nesting Easter Eggs are provided in this tutorial here.
9. Rothko Easter Eggs:
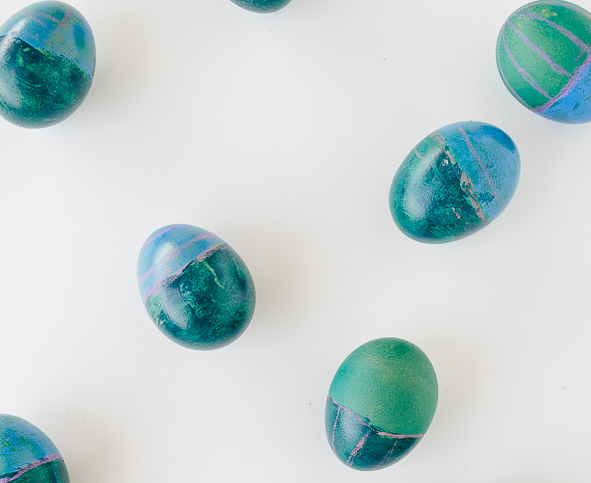
Boost your Easter décor with the simple sophistication of Rothko Easter eggs. Aiming for a Mark Rothko-like effect, these eggs have bold color blocks and calming gradients.
Add a contemporary art touch to your party by creating Rothko replicas on eggshells, transferring every piece into tiny galleries full of abstract splendor.
For detailed instructions on creating your own Rothko Easter Eggs, go here.
10. Confetti Easter Eggs:
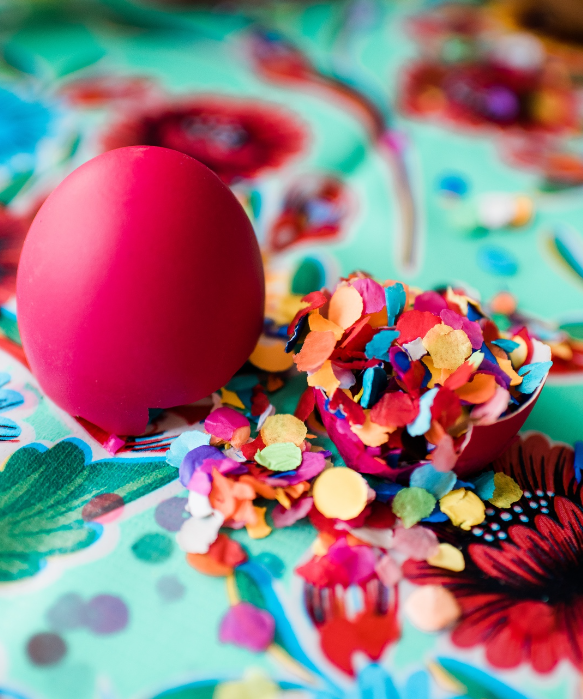
In a spirit of joy and color, celebrate Easter with Confetti Easter Eggs. These eggs are a playful addition to the egg hunt celebrations with their colorfully festive confetti.
Whether you hide them for an egg hunt or use them as bright centerpieces, these eggs bring new fun and a sense of surprise to your Easter party.
Check out this tutorial for a step-by-step guide on creating your Confetti Easter Egg.
11. Glow-in-the-Dark Eggs:
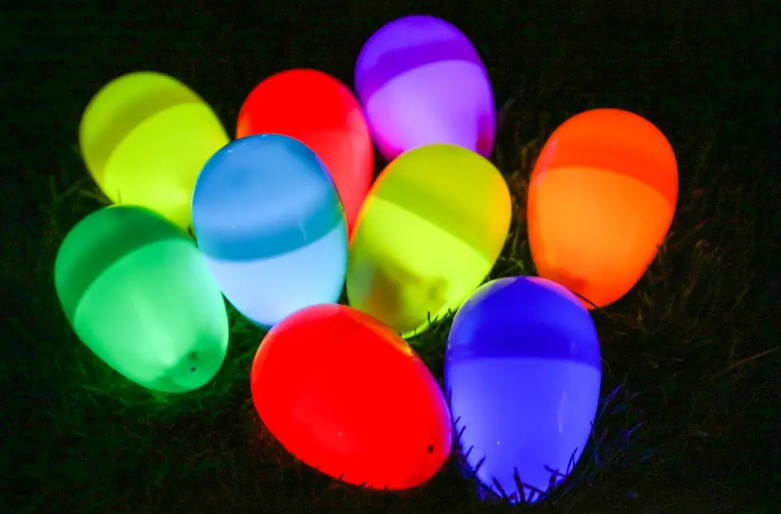
Make your Easter celebrations brighter with the magical glow of these eggs that light up after it gets dark.
Use luminescent paints or glow-in-the-dark stickers for a celestial show. The natural charm of these eggs will not just be an eye feast during the day but also turn the nights into a magical one.
To learn more about how to prepare Glow-in-the-Dark Eggs at home, click on this guide.
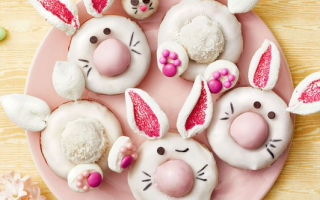
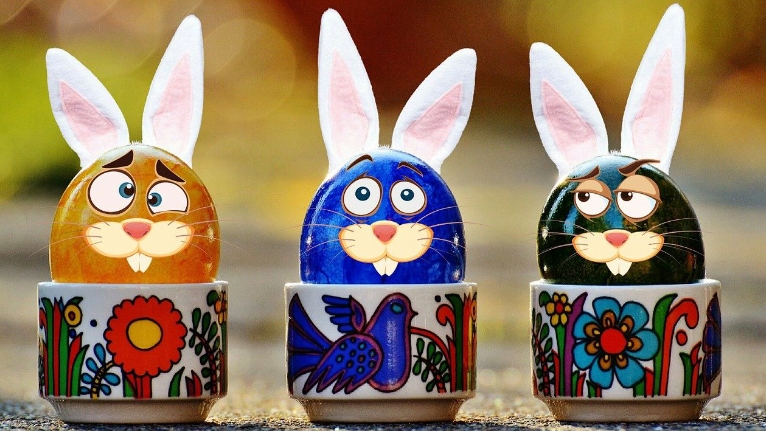
12. Painted Animal Eggs:
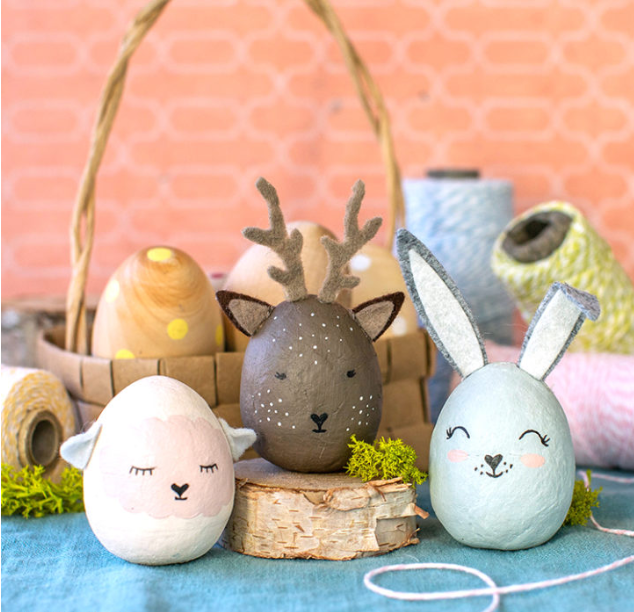
Infuse a bit of the animal world into your Easter egg basket with goofy painted creatures.
Whether you prefer rabbits, furry chicks, or grandiose elephants, let your inner artist out in the form of animals living on these paper canvases.
Click on this tutorial to learn how to make your own Painted Animal Eggs.
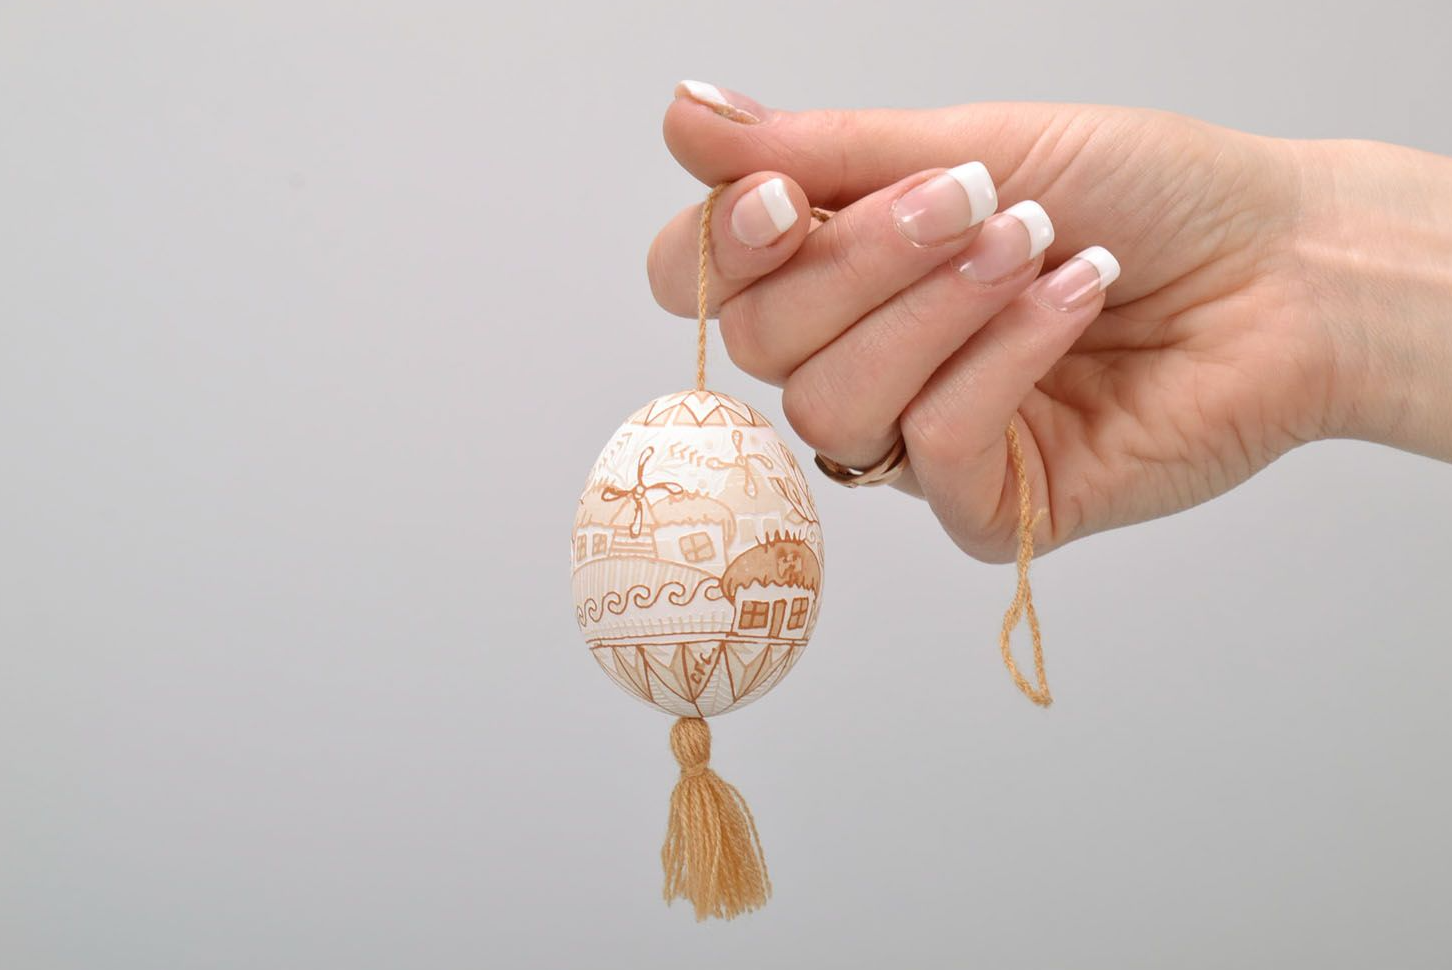
13. Heirloom Eggs:
Add a nostalgic touch to your Easter celebrations by creating heirloom eggs. Create timeless eggs using vintage styles, lace patterns, and other small delicate jewels.
These timeless masterpieces will not only enrich your celebration but may end up as valued family heirlooms.
For step-by-step instructions on making Heirloom Eggs, please see this tutorial here.
Heirloom
14. Sea Creature Eggs:
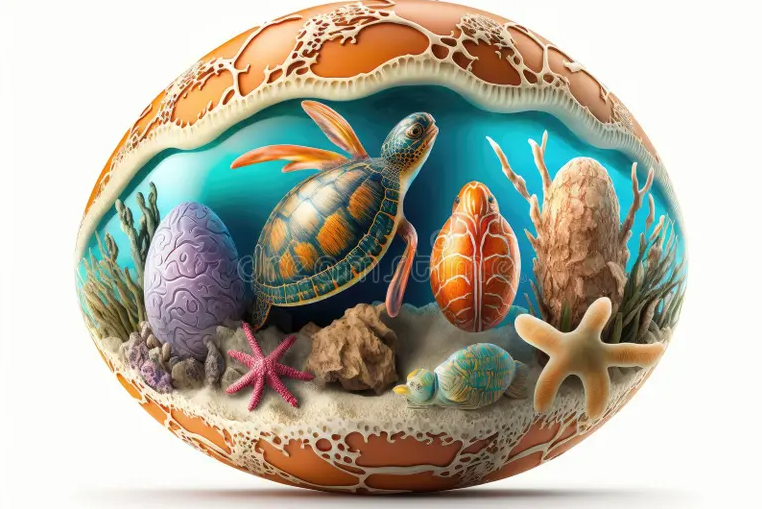
Explore the world of a noble sea creature by transfiguring eggs into bewitching marine animal forms. From brightly colored fish to elegant seahorses, use your imagination without any limitations.
Include oceanic shades and fabrics to make your Easter egg assemblage an embodiment of the beauty of nature at sea.
To make Sea Creature Eggs, click here for step-by-step instructions.
15. Painted Plastic Eggs:
Bring a modern twist to egg decorating with colorful plastic eggs. Include acrylic paints, glitter, and embellishments to get many patterns.
These eggs are reusable and tough enough to be used in long-term, environmentally friendly festivals.
For a step-by-step guide on creating your own Painted Plastic Eggs, visit the tutorial here.
16. Ombré Eggs:
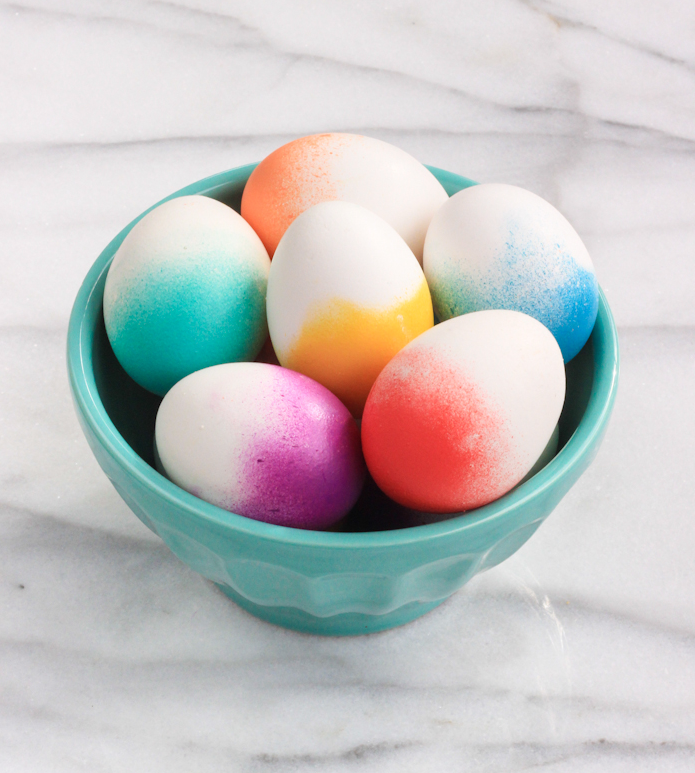
Begin your artistic voyage with an ombre egg—an enchanting gradient of colors that melds one shade into the next.
You can learn the art of blending and shading to make unique Easter eggs that reflect nature’s symphony on a spring day.
To learn more about the Ombré Eggs, refer to this guide.
17. Ice Cream Eggs:
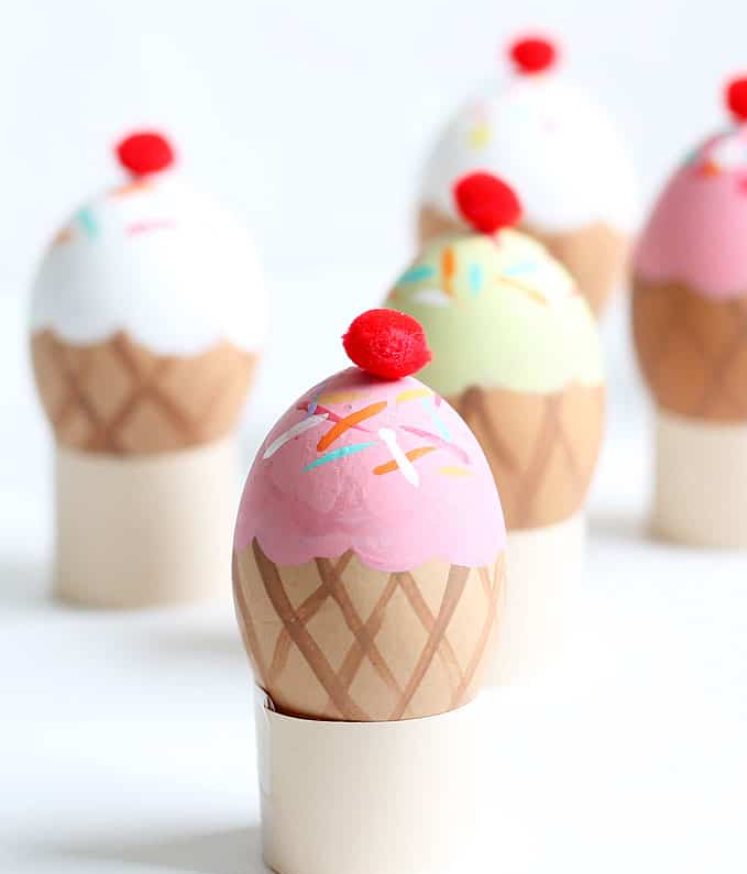
Settle your sweet tooth by being a little playful with ice cream-themed eggs.
Try using pastel colors and fun designs to make Easter eggs look like your favorite frozen treats, creating delectable masterpieces.
This tutorial provides the necessary steps to create your own Ice Cream Eggs.
18. Burger Eggs:
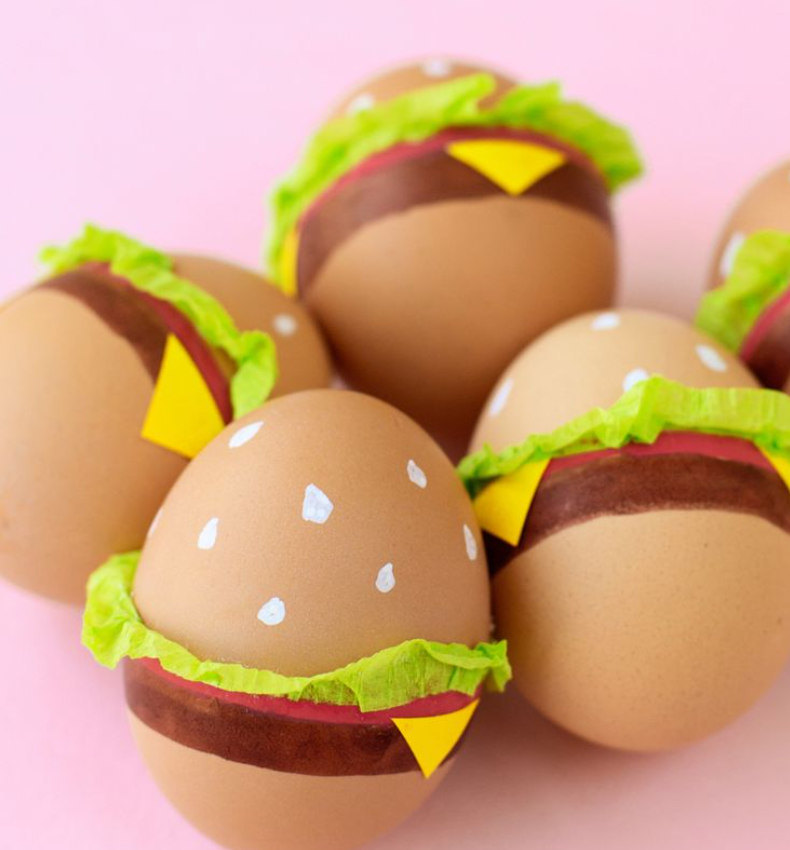
Enter the world of culinary artistry as you turn eggs into baby burgers.
From seeds grained to detail to subtleties of lettuce green produce, these fun Easter eggs take a savvy turn on your energizing show.
Check this tutorial here to learn how to prepare your own Burger Eggs.
19. Flowery Eggs:
Take part in celebrating spring bloom with ornately decorated eggs featuring flower patterns on their surface.
Master the subtle craft of floral motifs to introduce nature’s beauty in your Easter eggs and convey their message of a new season.
If you want to know how Flowery Eggs can be produced, click here for this tutorial.
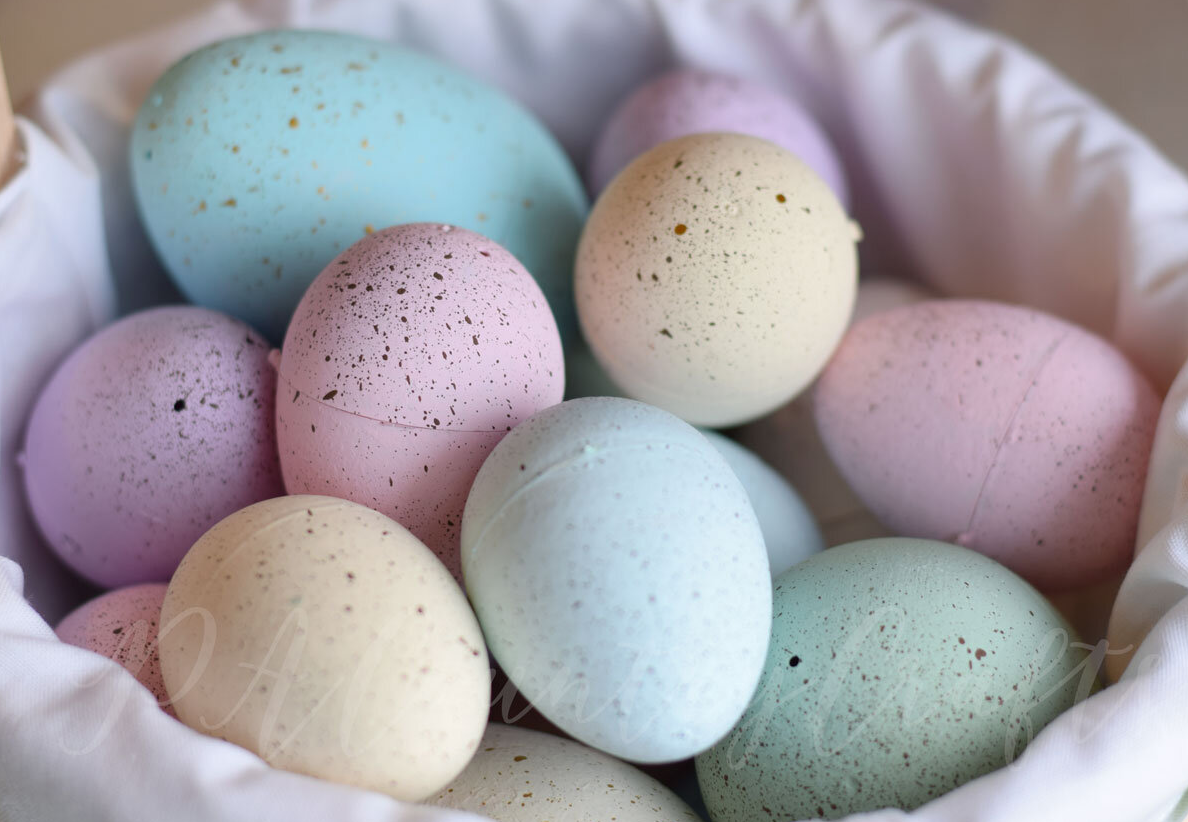
20. Robins Eggs:
Embrace patterned flowers scattered with speckled coloring to give an eggshell beauty and soft, earthy undertones.
This concept of bringing in a piece of the outside inside gives an outdoorsy appeal that freshens up everything through symbolism, renewals, and celebration.
For tutorials on homemade Robins Eggs, follow this link.
21. Mudcloth Eggs:

Capture the aesthetics of colorful mud cloth patterns to your Easter eggs.
Drawing motifs from West African cloth designs, these eggs are characterized by brown and beige tones as well as geometric shapes.
Indulge in your artistic creativity by whipping together a few patterns and creating an actual mudcloth artwork.
This video tutorial will show you how to create Mudcloth Eggs.
22. Washi Tape Eggs:
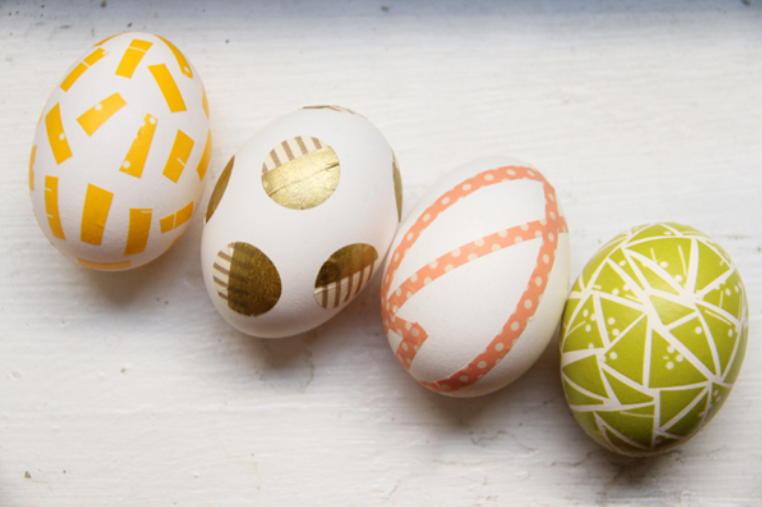
Washi tape offers you a range of colors and designs that help you create eggs in an easy way, which are smart but also modern.
Venture into your imagination as you experiment with combining tapes to create a unique and vibrant image.
Visit this tutorial to learn how to make your own Washi Tape Eggs.
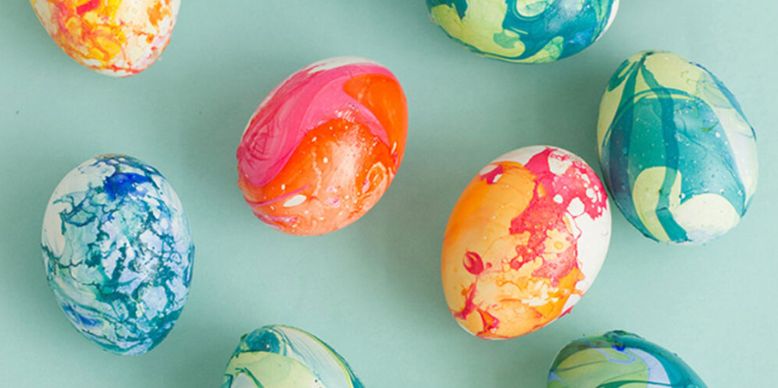
23. Marbled Eggs:
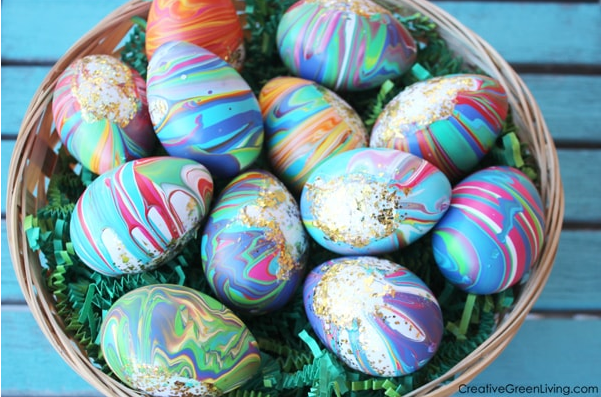
Transform your traditional Easter egg designs into astonishing marbled patterns. Combine nail polish and water to form beguiling patterns that have the smooth sophistication of marble.
The result of each dip is a unique masterpiece that will create an eye-catching center of attraction for your Easter celebration.
For this tutorial, click here to learn how you can make your own Marbled Eggs.
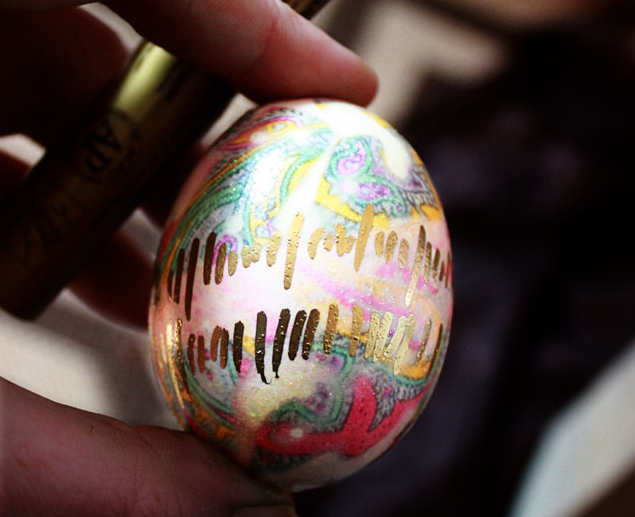
24. Tattoo Easter Eggs:
Add some trendy flavor to your eggs using temporary tattoos.
With designs like floral motifs, temporary tattoos provide the perfect hassle-free way of adding intricate artwork to your eggs.
This tutorial will show you how to make Tattoo Easter Eggs independently.
25. Onion Skin Dye Eggs:
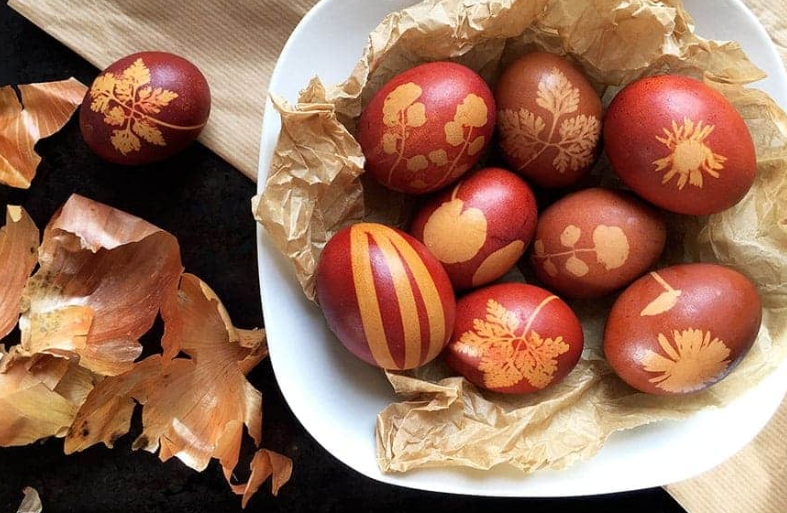
Embrace nature and enjoy the subtle earthy tones of onion skin to color your Easter eggs.
This ancient method covered eggs with onion shells and then boiled them, adding a stunning, natural dye.
Click on this tutorial to learn how to make your own Onion Skin Dye Eggs.
26. Sprinkle Eggs:
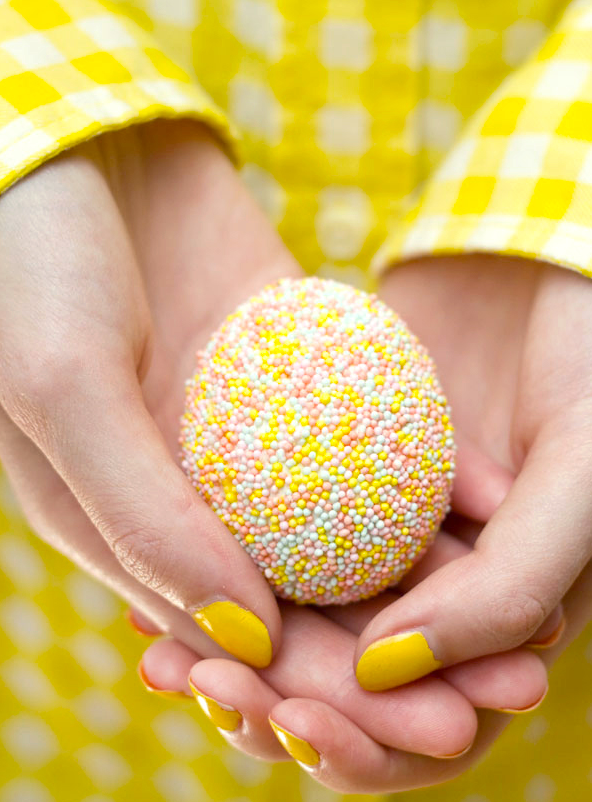
Enjoy the sweetness of this season and offer your eggs different colors with various colored sprinkles.
Use this whimsical technique for a fun texture and colorful pop, which make your eggs suddenly more attractive eye candy.
For detailed instructions on making your own Sprinkle Eggs, click here.
27. Flower Crown Eggs:
Use small artificial flowers and a slight amount of glue to create tiny floral arrangements that garnish your eggs with botanical sophistication.
These masterpieces help you bring nature into your Easter display and celebrate the spring blossom in a fantasy-like yet classy manner.
To access this DIY tutorial on how to make Flower Crown Eggs, click here.
28. Shaving Cream Eggs:
Elevate your Easter egg decorating to marbled masterpieces with the shaving cream technique.
Brilliant swirls of color shimmy across the eggshell as it revolves in a mixture created using food coloring and whipped cream.
This tutorial shows you how to make your own Shaving Cream Eggs.
29. Foil Eggs:
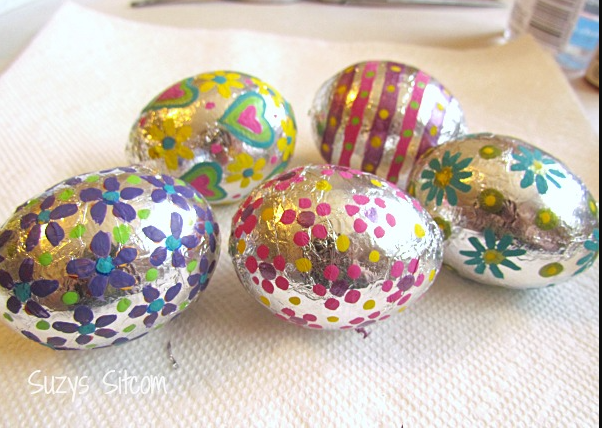
A blend of simplicity and complexity, this technique entails covering eggs with metallic foil to achieve a shining effect.
Play around with different shades to achieve a lavish jewel-like finish that adds a bit of glamour to your Easter celebrations.
For the tutorial on how to make a Foil Egg yourself, click here.
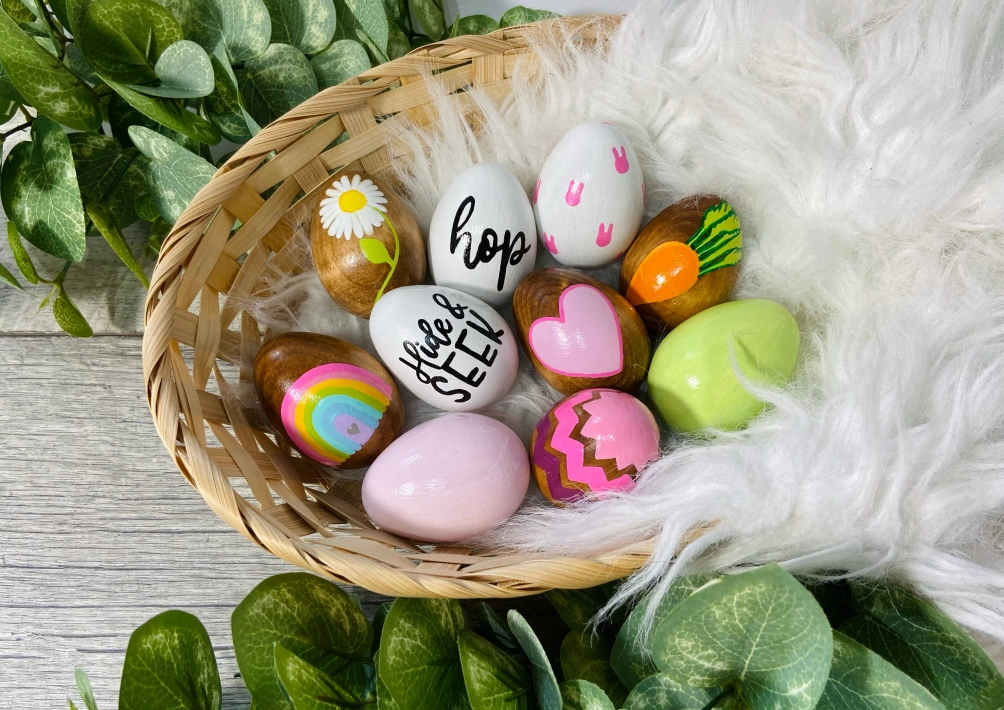
30. Pantone Eggs:
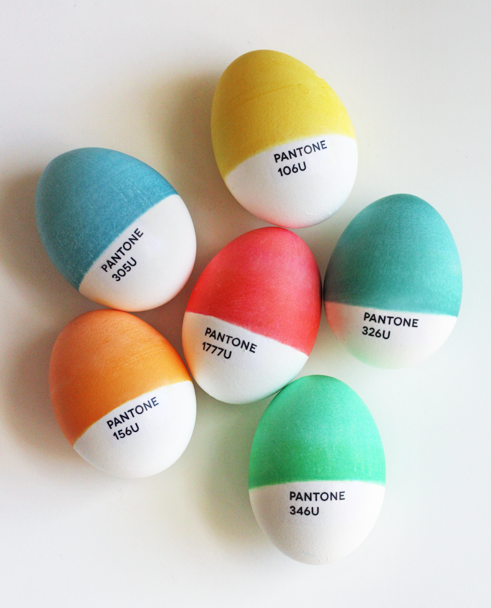
Embrace your Easter eggs with an art-based approach because of the iconic Pantone color palette.
Use an uninterrupted color to paint each egg, replicating the smooth pattern of Pantone chip colors and providing a modern touch on classic Easter ornaments.
You can click on this tutorial to learn how you will make your own Pantone Eggs.
31. Mosaic Eggs:
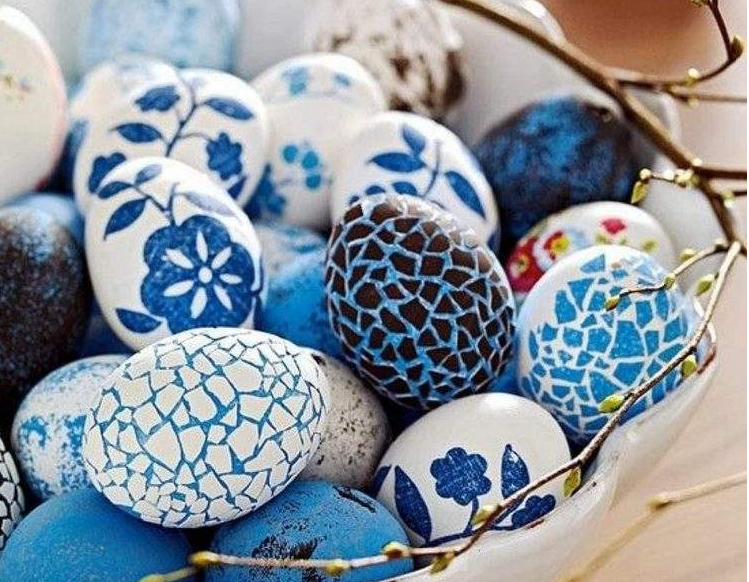
Embrace the delicate beauty of mosaic eggs by creating beautiful patterns from small, colorful pieces.
Whether it is made of small paper squares, sequins, or even painted pieces of eggshell fragments – mosaic eggs are a beautiful way to personalize Easter decorations.
This tutorial will teach you how to make your own Mosaic Eggs.
32. Emoji Eggs:

Have some fun while celebrating a happy easter with emoji eggs. These unusual and eccentric decorations introduce a new breath of life into an old Easter egg.
Make the faces of your favorite emojis as happy ones or maybe with some funny looks, using acrylic paint to carve them out.
This do-it-yourself tutorial shows you how to make Emoji Eggs yourself.
33. Black and White Eggs:
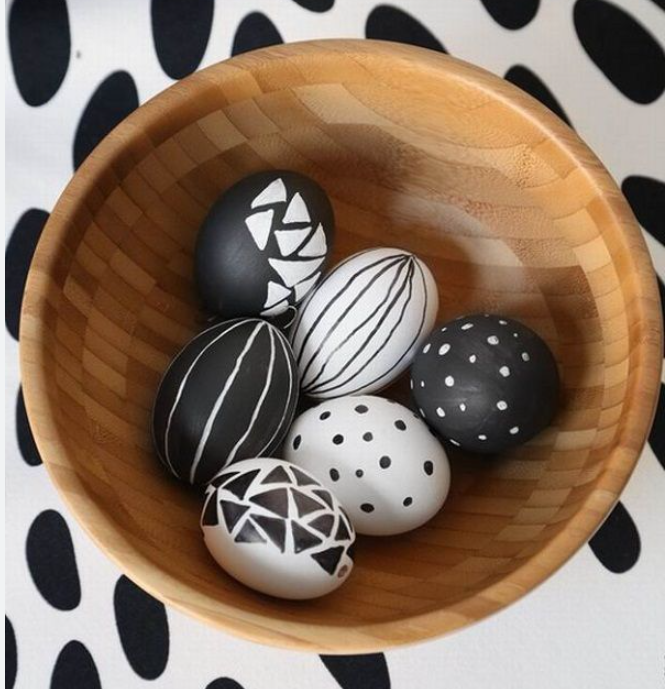
With black and white eggs, enjoy the beauty of simplicity. This monadic design adds sophistication to your Easter decor.
Draw varieties of detailed lines or simply minimalistic designs with black markers or paint. With the black against an egg’s original color, you are looking at a cool contrast that stands out.
Click here to see how you can make the Black and White Eggs for your tutorial.
34. Balloon Eggs:

Enhance your Easter egg decorating with balloon eggs. Imitate the balloon shapes and colors by creating colorful paint or marker patterns.
This fanciful and lively style splashes a burst of color into your Easter holiday setting, with the eggs appearing as vibrant ornaments.
Here is a tutorial to teach you how to create your Balloon Eggs.
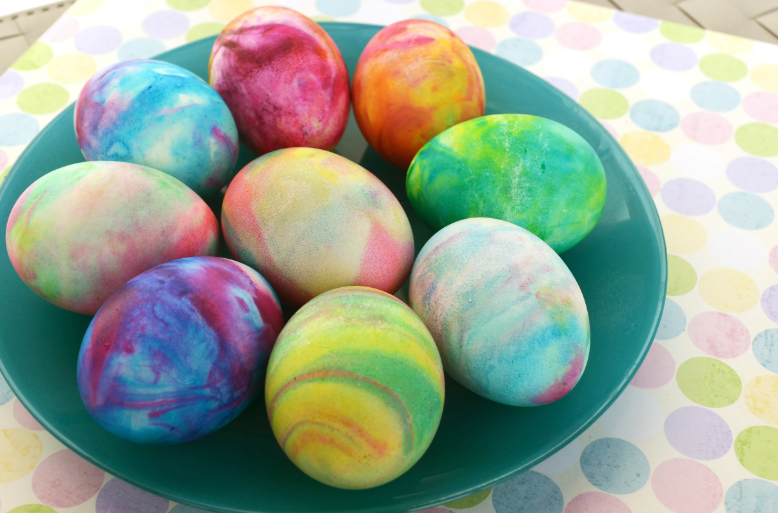
35. Blotted Eggs:
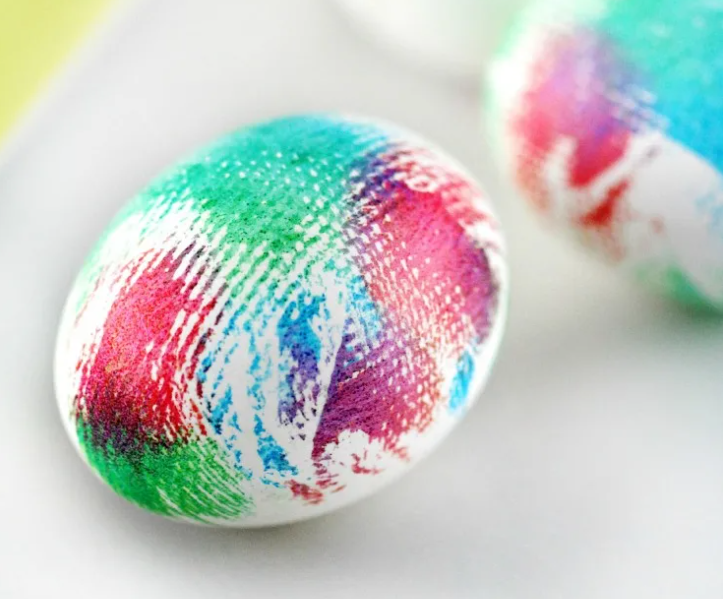
Uncover the magical art of blotted eggs, a method that offers ethereal watercolor patterns. Eggs give themselves into the watercolor paints, merging and forming abstract patterns.
It all produces pure, delicious, painstakingly beautiful eggs, like little artistic masterpieces.
What follows is a tutorial on how to make your own Blotted Eggs.
36. Baby Chick Easter Eggs:
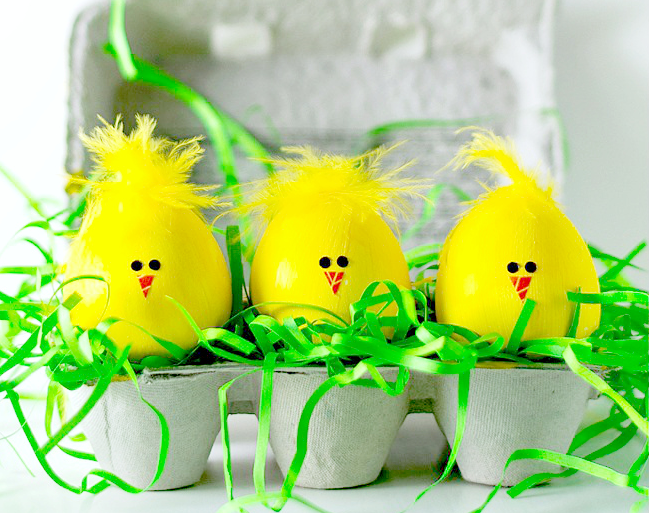
Turn run-of-the-mill eggs into cute little chickies with the Baby Chick Easter Eggs concept.
You can make inspired baby chicks by applying contrasting colors and fundamental elements to brighten everyone’s day.
This tutorial explains how you can make your own Baby Chick Easter Eggs.
37. Kool-Aid Eggs:
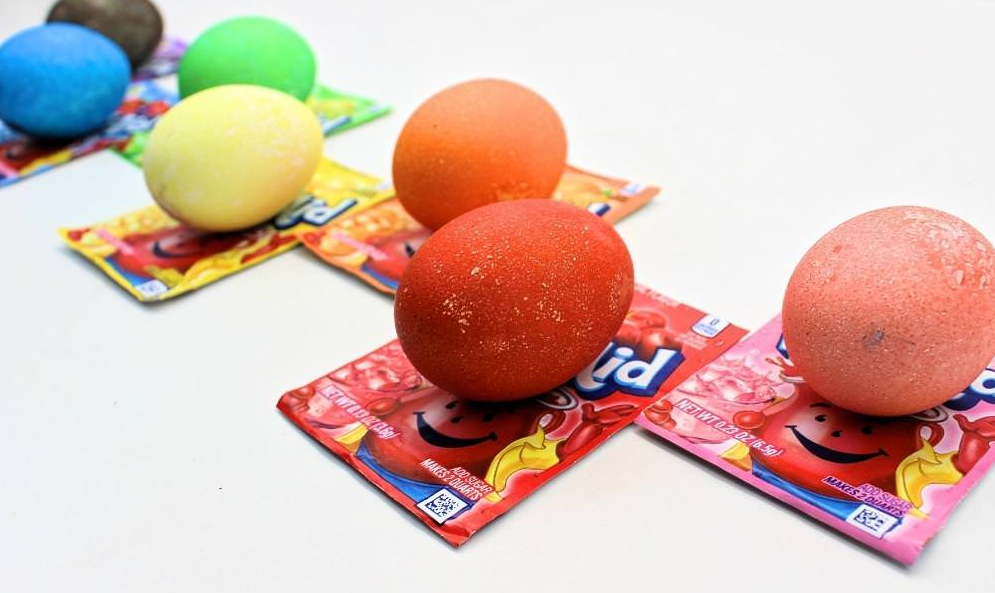
Bring an explosion of color and smell into your egg-decoration quest with Kool-Aid Eggs!
This unusual method uses powdered drink mix to form bright, tie-dye-inspired patterns.
Find out how to prepare your personalized Kool-Aid eggs here.
38. Metallic Eggs:
The contemporary concept of Metallic Eggs is the ultimate resort to enhance your Easter decorations. Include metallic paints, foils, and other embellishments for a shiny and refined look.
These eggs have a modern energy and make beautiful-looking table centerpieces, bringing the feeling of contemporary Easter to life.
Click here to learn how you can make your own Metallic Eggs.
39. Stone Eggs:
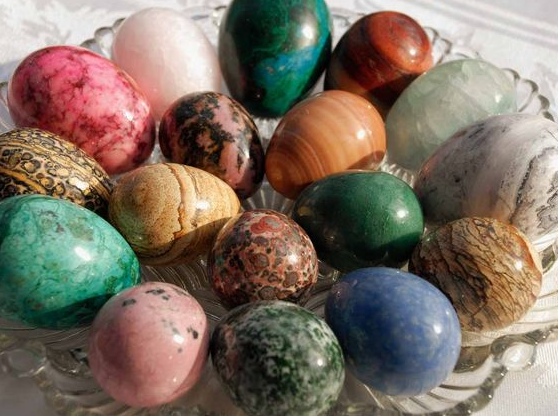
Driven by the idea that nature is beautiful, this touch involves making your eggs look like stones because of their texture and appearance.
Get a tactile and earthy feel resulting in Easter eggs that blend with good use of an outdoor garden-themed celebration.
This tutorial teaches how to make the Stone Eggs of your own.
40. Piñata Eggs:
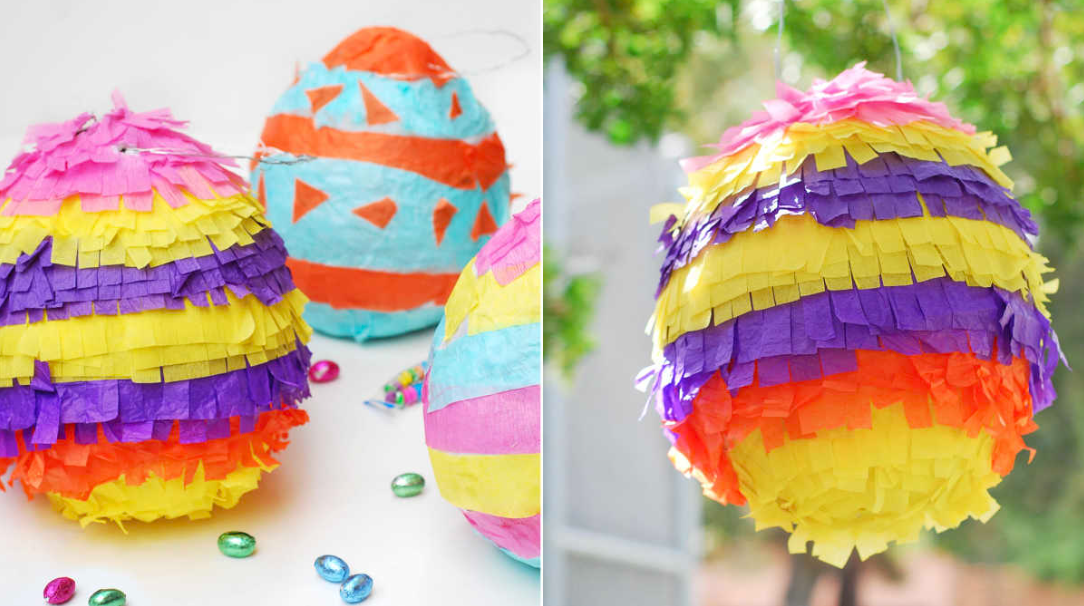
Bring a touch of surprise and celebration to your Easter celebrations with Piñata Eggs. Color the eggs with various bright colors and put small gifts or surprises inside them.
These Piñata eggs can be used as decorative objects that create a festive mood or amidst interactive elements in an Easter egg hunt.
Here, you can find directions on how to make your own Piñata Eggs.
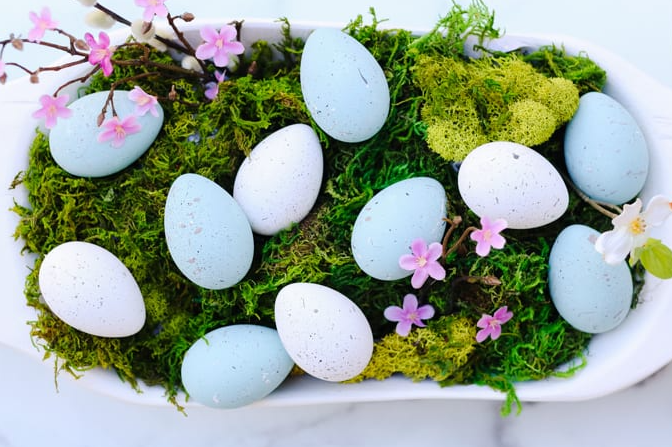
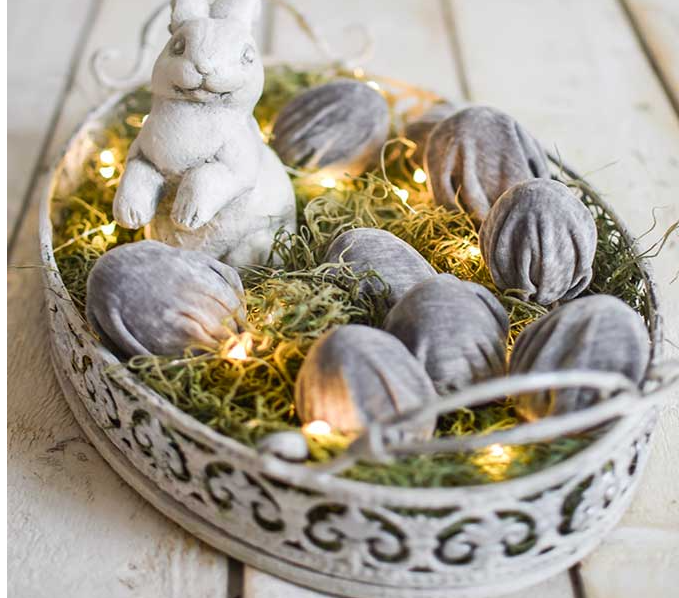
41. Mossy Eggs:
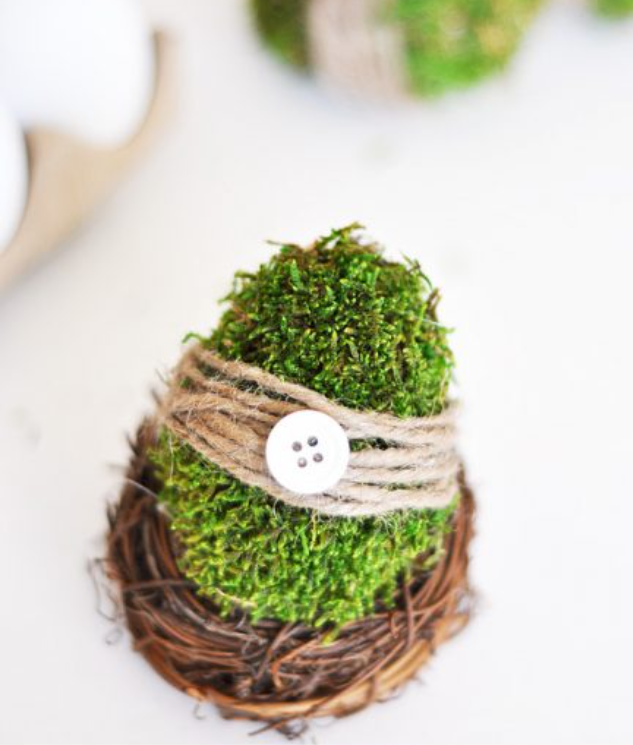
With Mossy Eggs, nature becomes a protagonist, and so this is an organic and rustic approach to egg decorating at Easter.
Place your eggs amidst the bounty of moss, creating a sensual texture that invites nature indoors.
If you want to learn how to create your own Mossy Eggs, click on this tutorial.
42. Gold Dip Eggs:
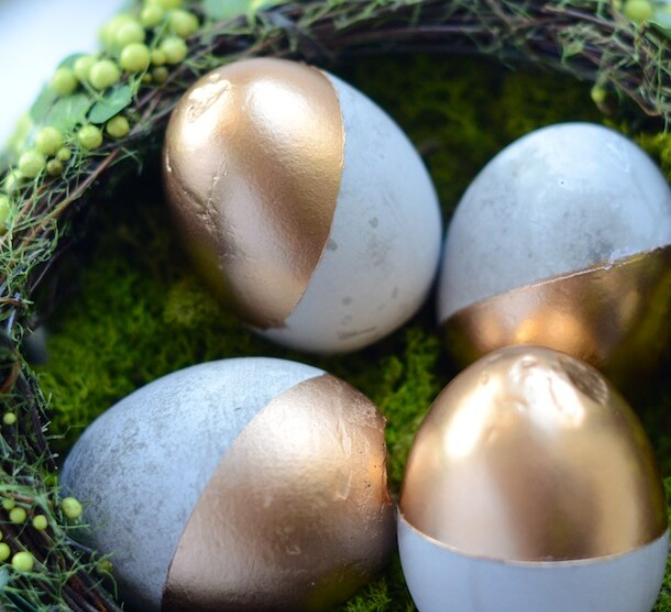
Immerse your eggs in a bath gilded with gold, silver, or copper and create an alluring ambiance.
This age-old technique makes your Easter centerpiece a little more glamorous by turning ordinary eggs into beautiful golden jewels that reflect the light and catch the eye.
This tutorial will teach you how to make Gold Dip Eggs independently.
43. Nail Polish Eggs:
Awaken the inner artist in you with Nail Polish Eggs, a colorful and novel way of painting Easter eggs.
Various shades of nail polish that are dipped, swirled, and patterned create multicolored flowing patterns, which give the finish a shiny appearance similar to those found on artsy fingernails.
To make your own Nail Polish Eggs, click on this tutorial.
44. Galaxy Eggs:
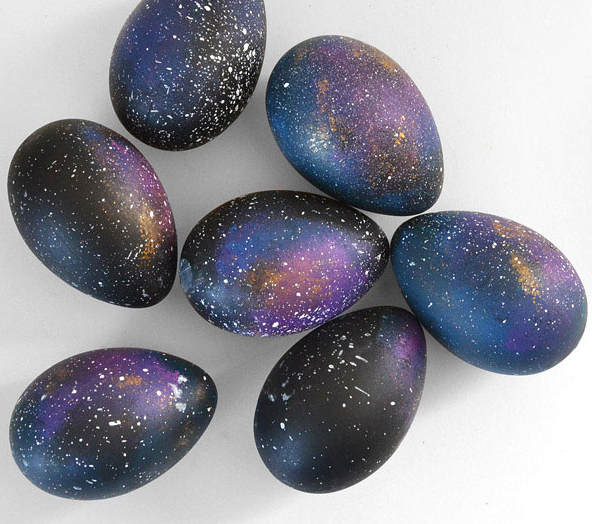
Thrill your Easter eggs with a cosmic expedition where secrets of the universe are revealed through Galaxy Eggs.
Include shiny metallic embellishments and marvel as your eggs develop into miniature galaxies, bringing the wonder of the universe to your hand.
This tutorial will show you how to make your own Galaxy eggs.
45. Seismograph Eggs:
Introducing Seismograph Eggs, an enthralling and kinetic seismogram-inspired story for Easter egg decorating.
Try out bold, spiraling patterns and bright colors to replicate the exciting marks shown on seismographs when there are earthquakes.
To make your own seismograph eggs, you may follow this tutorial.
46. Velvet Eggs:
Step into a realm of wealth with Velvet Eggs – an extravagant take on conventional egg embellishment. Wrap your eggs in soft, velvety textures for a touch and visually appealing masterpiece.
The velvet contrast, so smooth and silky against the delicate eggshell shell, provides a sophisticated touch to your Easter decoration.
For creating your own Velvet Eggs, click on this guide.
47. Minimal Eggs:
Simple is beautiful on Minimal Eggs, where minimalism becomes the definition of sophistication. Include basic lines, medium shades, and uncomplicated visuals.
These hidden gems illustrate the happiness of simplicity, allowing us to appreciate this beauty without sacrificing modern aesthetics.
Click here for more information on how to prepare your own Minimal Eggs.
48. Strawberry and Carrot Eggs:
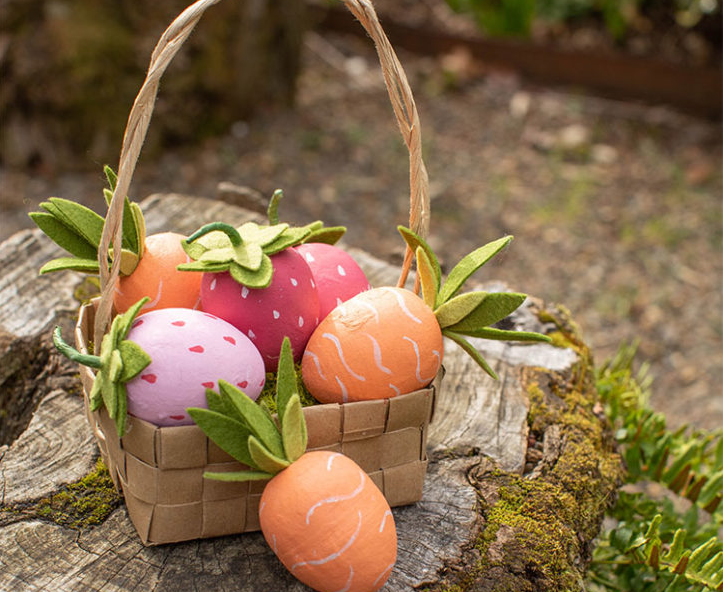
Give your eggs a cute appearance of fruits and vegetables, using bright colors for the deep red strawberries or lively orange carrots.
It is also created with a whimsical sense of lightheartedness and comes across as the natural touch to your Easter décor.
With this tutorial, you’ll be able to create homemade Strawberry and Carrot Eggs.
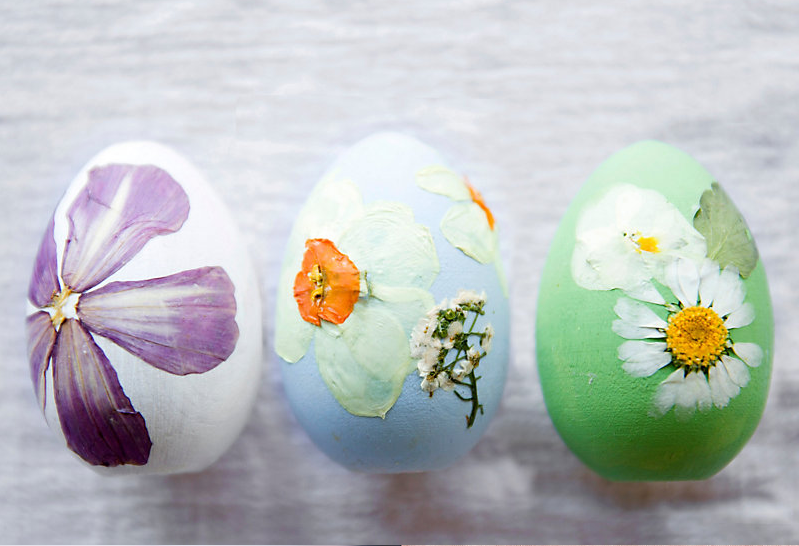
49. Botanical Eggs:
Bring a touch of spring to your Easter festivities with the Botanical Eggs. Divine the natural beauty on your eggs by festooning them with faint flowers, leaves, and herbs.
This attractive natural and magic arrangement is a spirit of spring present all around.
Click on the following tutorial for your own Botanical Eggs.
50. Cactus Eggs:
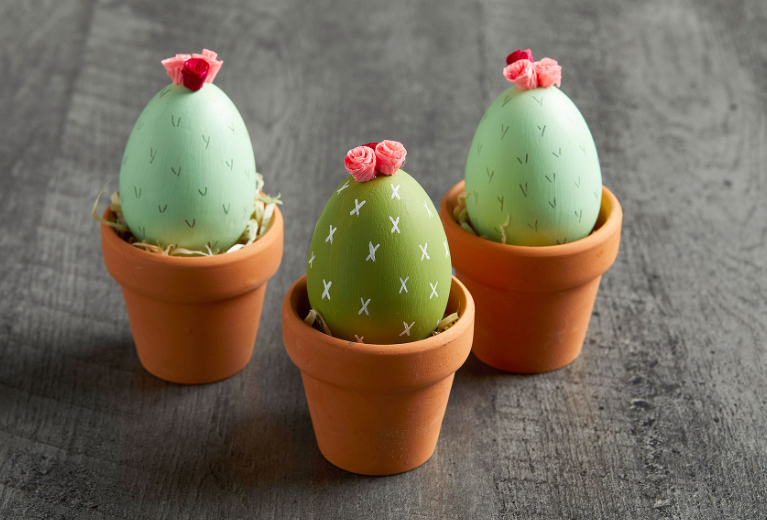
Embrace the unconventional with Cactus Eggs – a unique and amusing take on Easter egg decorating. Splash your eggs in hues of green with cactus patterns for a playful and distinct touch.
These beautiful and quirky decorations will help create a southern-inspired Easter spread, which will get everyone talking.
To make your own Cactus Eggs, click on this tutorial.
Tips for Preserving and Displaying Decorated Eggs
Method for hollowing out eggs for long-term preservation
Hollowing out the eggs preserves decorated eggs for a long time so they do not lose their quality over time. Follow these steps for effective egg hollowing:
1. Piercing the Egg: Pierce both ends of the egg with a pin or needle. Make a small hole slightly bigger on one side to make removing egg content easy.
2. Blowing Out the Contents: Place the egg over a bowl with a large hole down. Breathe out through the small opening, slowly pushing everything into the bowl. Wash the hollow egg with water and let it air dry.
3. Reinforcing Fragile Shells: Optionally, support the fragile eggshells using equal parts water and white glue. This makes the shell more durable, an important factor for long-term preservation.
4. Decorating and Sealing: Place the egg in your preferred decoration when it is empty and dried out. Fill the holes with a clear sealant or wax to prevent dust particles and insect infiltration.
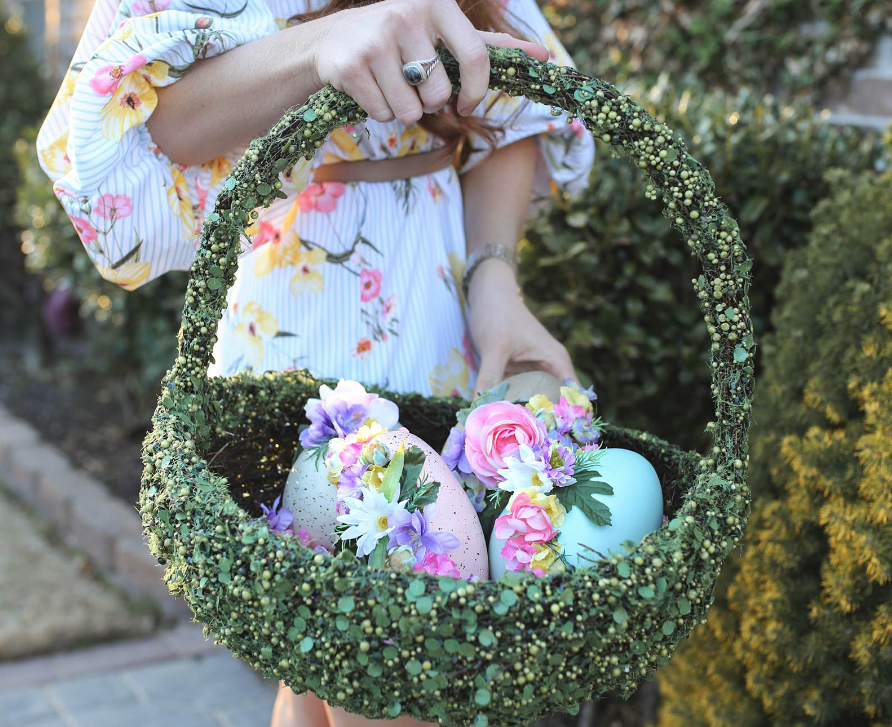
Creative display ideas for decorated eggs
Transform your decorated eggs into captivating works of art with these imaginative display ideas that showcase their beauty and enhance the festive atmosphere:
1. Egg Tree Centerpiece: Make an impressive centerpiece by hanging ornaments with decorated eggs on a small decorative tree. Select different colors and themes, and hang the eggs delicately to bring a playful air to your table.
2. Nested Egg Arrangement: Place the eggs in a nest or artificial grass to create an effect with nature for display. This organization brings out the renaissance of rebirth and always blends with Easter’s seasonal theme.
3. Floating Egg Garland: Make a floating egg garland by suspending hung decorated eggs with transparent fishing lines at uneven heights. The garland can be suspended on a door or more attractively along the side of a mantel.
4. Egg Cloche Display: Display single decorated eggs behind glass cloches or domes. This beautiful and classic presentation brings beauty to your interior while protecting it from dust.
5. Egg Shadow Box: Use a shadow display to arrange decorated artificial eggs. Integrate background components, such as colored paper or cloth materials, to complement the look of your arrangement.
Safety tips for edible vs. display-only eggs
It is of utmost importance to safeguard characters when utilizing both edible and display-only eggs. Here are essential safety tips for handling each type:
Edible Eggs:
1. Freshness is Key: Start with fresh, clean eggs. Ensure you also check out the expiration date and use eggs stored in the refrigerator properly.
2. Thorough Washing: Wash eggs with warm water and mild detergent before handling. This facilitates the elimination of any contaminants that may be present in the shell.
3. Avoid Cracked Eggs: Use only uncracked and undamaged eggs. The integrity of the shell can be compromised by cracks that allow bacteria to find their way inside.
4. Proper Cooking: If you intend to eat the eggs, they should be well cooked. Cooking eggs to the required degree eliminates foodborne diseases from posing risks.
Display-Only Eggs:
1. Choosing Safe Materials: When working with non-edible materials for decorative eggs only, ensure they are inert and do not pose a threat. Do not use materials that can release poisonous substances.
2. Secure Attachment: In case of decorations with small accessories or embellishments, ensure they are glued on the egg. This aids in reducing cases of children or pets accidentally ingesting them.
3. Dust and Allergens: Time can accumulate dust on display only eggs. Store them in a neat setup, ensuring that they are covered if stored to prevent dust build-up.
Conclusion: Celebrating Creativity and Tradition in Easter Egg Decorating
The art of decorating Easter eggs is a timeless tradition that beautifully blends creativity, culture, and celebration.
Each stroke of color and every carefully placed embellishment tells a story, connecting us to the rich tapestry of history and the joyous spirit of Easter.
These adorned eggs are not mere decorations; they are symbols of renewal, fertility, and the jubilation that accompanies the arrival of spring.
May your Easter be filled with the beauty of creativity, the warmth of tradition, and the joy that comes from crafting something truly extraordinary. Happy decorating!