Welcome to the enchanting world of holiday baking, where flour, sugar, and spices come together to create a delightful treat and a cherished tradition.
In this festive guide, we embark on a magical journey to discover the art of crafting a Gingerbread House, a symbol of warmth, joy, and the holiday spirit.
Whether you’re a seasoned baker or a novice in the kitchen, this step-by-step tutorial will unravel the secrets behind creating a whimsical masterpiece that not only tantalizes taste buds but also captures the essence of the season.
So, dust off your apron, gather your ingredients, and delve into the heartwarming process of building and decorating a Gingerbread House that will undoubtedly become a centerpiece of merriment and sweet memories for years to come.
Gathering Materials and Ingredients
In our journey to create a captivating Gingerbread House, we focus on gathering materials and ingredients.
Like a conductor assembling instruments for an orchestral masterpiece, preparing for the construction of a gingerbread abode requires careful selection and organization.
Comprehensive list of ingredients needed for gingerbread dough and icing.
Before diving into the baking process, take a moment to organize your ingredients and tools. Clear a spacious countertop, set out your mixing bowls, and ensure all necessary materials are within reach.
This meticulous preparation streamlines the baking experience and adds a dash of anticipation to the creative process.
1. Ingredients for the Gingerbread Dough:
- Flour
- Brown sugar
- Unsalted butter
- Molasses
- Ground ginger, cinnamon, and cloves
- Baking soda
- Salt
2. Baking Tools:
- Rolling pin
- Cookie cutters (for house pieces)
- Parchment paper
- Baking sheets
- Oven
3. Construction Materials:
- Royal icing (powdered sugar, egg whites, and lemon juice)
- Candy canes, gumdrops, and assorted candies
- Piping bags and tips
- Assorted sprinkles
- Small, flat spatula or knife for spreading icing.
4. Templates and Designs:
- Gingerbread house templates (readily available online)
- Your creative ideas for decorating
Overview of tools and materials required
The bustling workshop of gingerbread delights, where tools and materials come together to lay the foundation for your festive masterpiece.
This section delves into the essential gear required to transform your kitchen into a holiday haven.
From the electric mixer’s rhythmic hum to the piping bag’s precision, each tool is crucial in bringing your gingerbread house dreams to life.
Tools and Materials for Making Gingerbread Dough:
- Mixing Bowls: For combining dry and wet ingredients.
- Measuring Cups and Spoons: Accurate measurements are crucial.
- Electric Mixer or Stand Mixer: Mix butter and sugar and mix the dough.
- Rolling Pin: Roll out the gingerbread dough evenly.
- Cookie Cutters: House-shaped cutters for creating walls and roof pieces.
- Parchment Paper: Prevents sticking during baking.
- Baking Sheets: Place the gingerbread pieces in the oven.
Tools and Materials for Baking:
- Oven: To bake the gingerbread pieces to perfection.
Tools and Materials for Making Royal Icing:
- Sifter: For sifting powdered sugar to avoid lumps.
- Mixing Bowls: For preparing and tinting royal icing.
- Electric Mixer or Stand Mixer: Whip up the royal icing to the right consistency.
- Piping Bags: For piping and decorating.
- Piping Tips: Various tips for different icing designs.
- Rubber Spatula or Spoon: For filling and spreading icing.
Tools and Materials for Decorating:
- Candies and Decorations: For embellishing candy canes, gumdrops, and assorted candies.
- Sprinkles: For adding a festive touch.
- Small, Flat Spatula or Knife: For spreading icing and attaching decorations.
Additional Tools:
- Gingerbread House Templates: To guide the cutting of gingerbread pieces.
- Cooling Rack: To cool gingerbread pieces before assembly.
- Clean, Flat Surface: For assembling and decorating the gingerbread house.
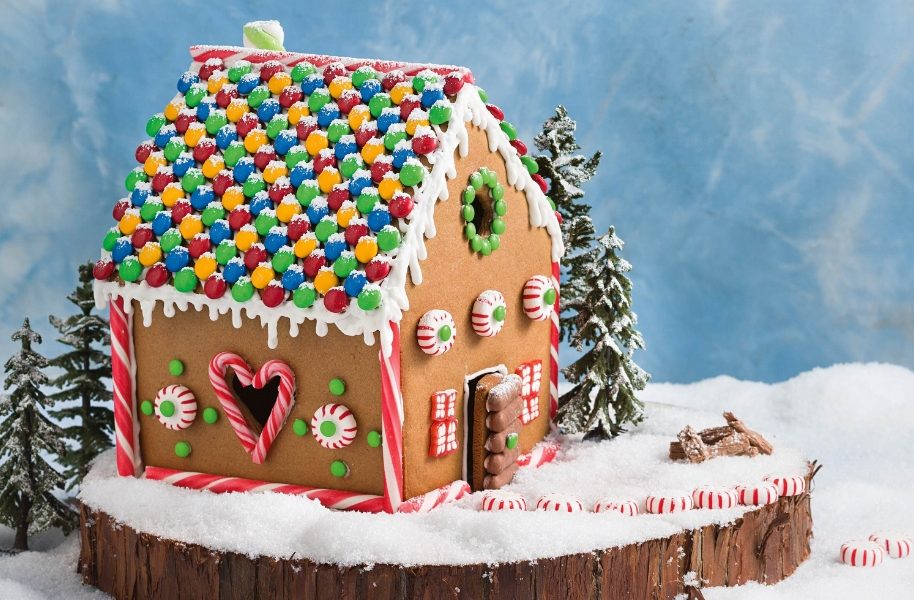
Suggestions for decorative elements
Decorating a gingerbread house is about the construction and the magical transformation into a festive work of art. Here are some delightful suggestions for decorative elements to add charm and whimsy to your gingerbread creation:
- Candy Canes: Line or use the roof’s edges as festive pillars.
- Gumdrops: These colorful, chewy treats can be arranged as windows or pathway stones.
- Miniature Chocolate Bars: Create a chocolatey fence around your gingerbread house or break them into smaller pieces for shingles.
- Peppermint Candies: Crushed peppermint candies can be sprinkled on the roof for a snowy effect.
- Pretzels: Use pretzel sticks for a log cabin look or break them into smaller pieces to simulate wood details.
- M&M’s or Smarties: Perfect for adding color as pathway stones or colorful decorations.
- Licorice: Twist or braid licorice to make festive borders or use them as window shutters.
- Edible Glitter or Dust: Sprinkle edible glitter over the roof or other surfaces for a magical, sparkling effect.
- Shredded Coconut: Dye coconut flakes with food coloring to create edible snow.
- Silver Dragees: These small, metallic balls add an elegant touch to your gingerbread house.
- Crushed Nuts: Pecans or walnuts can be ground and used for a textured pathway or as decorative accents.
- Chocolate Chips or Chunks: Press them into the gingerbread dough before baking for added sweetness.
- Marshmallows: Create a snowy landscape by placing marshmallows strategically around the house.
- Fruit Roll-Ups or Gummy Fruit Strips: Cut them into strips for colorful ribbons or use them as shutters.
Preparing the Gingerbread Dough
Preparing the gingerbread dough is the foundational act of this festive culinary venture.
In a dance of measured precision, the kitchen comes alive as flour, brown sugar, molasses, and a medley of aromatic spices converge.
This alchemical process demands the gentle creaming of butter, the harmonious integration of dry ingredients, and the rich embrace of molasses, resulting in a fragrant, golden-brown dough ready to be rolled out and shaped.
With a rolling pin in hand, the dough transforms from a humble mixture to the building blocks of holiday magic, eagerly awaiting the touch of cookie cutters to fashion walls, roofs, and the essence of a sweet-scented abode.
Step-by-step instructions for making gingerbread dough.
Preparing the gingerbread dough is the initial enchantment in crafting your festive masterpiece.
Begin by blending the richness of molasses with the comforting warmth of brown sugar, spices, and butter, creating a fragrant dough that is as delightful to the nose as it is to the taste buds.
- Gather Your Ingredients: Collect all the necessary ingredients before you start. You will need 3 1/4 cups of all-purpose flour, 1/2 cup of packed brown sugar, 1 tablespoon of ground ginger, 1 tablespoon of ground cinnamon, 1/2 teaspoon of ground cloves, 1 teaspoon of baking soda, 1/2 teaspoon of salt, 3/4 cup of softened unsalted butter, and 3/4 cup of molasses.
- Preheat the Oven: Preheat your oven to 350°F (175°C). This ensures it’s ready when your gingerbread pieces are prepared for baking.
- Cream Butter and Sugar: In a mixing bowl, cream the softened butter and brown sugar until light and fluffy. This can be done using an electric mixer or with a sturdy spatula.
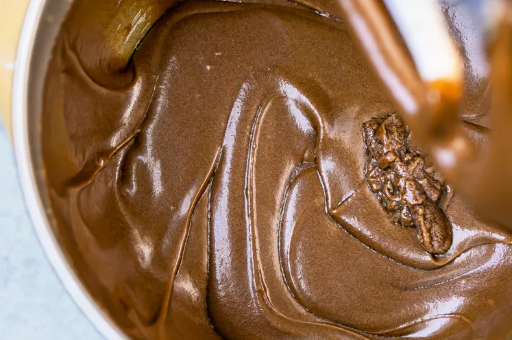
- Add Molasses: Gradually add the molasses to the butter and sugar mixture. Continue mixing until well combined. The molasses will give your gingerbread dough its rich flavor.
- Combine Dry Ingredients: In a separate bowl, whisk together the flour, ground ginger, ground cinnamon, ground cloves, baking soda, and salt.
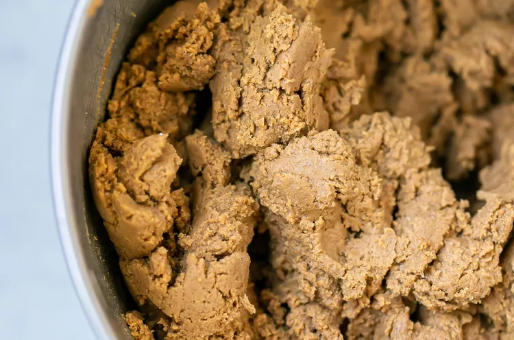
- Mix Wet and Dry Ingredients: Slowly add the dry ingredient mixture to the wet ingredients, stirring continuously until a soft dough forms. Make sure all ingredients are well incorporated.
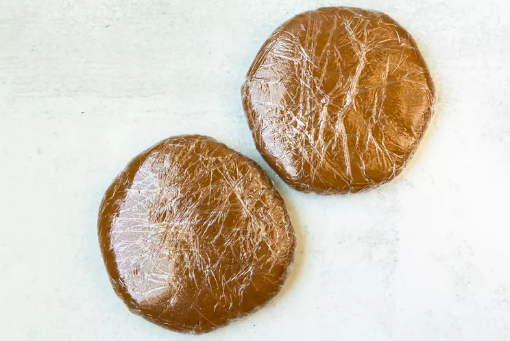
- Chill the Dough: Wrap the gingerbread dough in plastic wrap and refrigerate it for at least 1 hour or until firm. This chilling step makes the dough easier to handle and helps the flavors meld.
- Roll Out the Dough: Preheat the oven if necessary. Roll out the chilled dough to your desired thickness on a floured surface, usually around 1/4 inch.
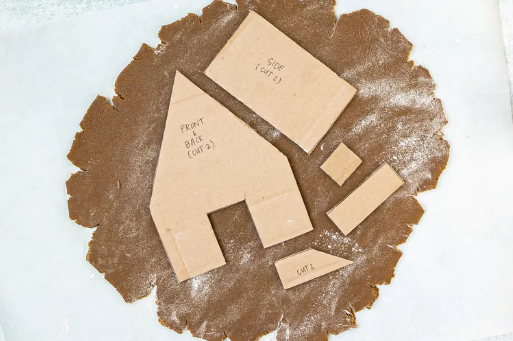
- Cut Out Shapes: Use gingerbread house templates or cookie cutters to cut out shapes for your gingerbread house. Carefully transfer the cut pieces to a parchment paper-lined baking sheet.
- Bake in the oven for 10-12 minutes or until the edges are slightly firm. Be mindful not to over-bake to maintain a somewhat soft texture.
Tips for rolling and cutting the dough to ensure even thickness and proper shapes.
Handling a gingerbread masterpiece requires precision and finesse when rolling and cutting the dough.
Here are eight essential tips to ensure even thickness and the perfect shapes for your delightful creation:
- Chill the Dough: Ensure the gingerbread dough is thoroughly chilled before rolling to make it more manageable and reduce sticking.
- Flour Your Surface: Dust your rolling surface lightly with flour to prevent sticking, adding more as needed.
- Divide the Dough: Work with smaller portions of the dough, keeping the rest refrigerated to maintain uniform thickness and ease of handling.
- Rotate While Rolling: Turn the dough frequently as you roll to avoid uneven thickness and maintain a consistent texture.
- Use Guidelines: Employ guide rails, such as wooden dowels, to roll the dough evenly and achieve the desired thickness.
- Gingerbread House Templates: Utilize templates or cutouts to guide your cutting for a precise design and seamless assembly.
- Keep It Even: Apply consistent pressure while rolling to ensure the dough maintains an even thickness, checking regularly with a ruler or your fingers.
- Sharp Edges for Cutting: Use short, clean cookie cutters, pressing them straight down without twisting for well-defined shapes.
Guidance on chilling and resting the dough for optimal texture.
Achieving the perfect texture in your gingerbread dough hinges on the crucial steps of chilling and resting.
Once the ingredients meld harmoniously, wrap the dough in plastic and allow it to chill in the refrigerator for at least one hour.
This cooling period enhances the dough’s manageability and intensifies the flavors, culminating in a richer, more decadent taste.
After rolling out the chilled dough to your desired thickness, consider a brief rest on the baking sheet before cutting shapes.
This momentary pause allows the dough to relax, minimizing shrinkage during baking and ensuring that your gingerbread pieces maintain their intended shape.
Patience is a virtue in this process, as these intentional pauses contribute to the optimal texture that will make your gingerbread creation exceptional.
Cutting and Baking Gingerbread Pieces
As we enter the heart of our gingerbread construction venture, the artistry of crafting begins to unfold in the meticulous steps of cutting and baking the gingerbread pieces.
This section unveils the templates and techniques essential for sculpting your edible masterpiece’s walls, roof, and intricate components.
Guided by precision and creativity, these carefully cut pieces serve as the canvas upon which the holiday magic will take shape.
Templates and techniques for cutting out walls, roofs, and other house components.

Creating the architectural foundation of your gingerbread house requires precision in cutting out walls, roofs, and various components.
Utilize gingerbread house templates, readily available online, or craft your own from sturdy materials like cardboard.
When cutting, employ sharp, clean-edged cookie cutters for intricate shapes, ensuring a flawless fit during assembly.
Techniques such as using guide rails or templates provide guidance for achieving consistent and aesthetically pleasing pieces.
Detailed baking instructions, including temperature and timing.
Baking the gingerbread pieces is pivotal in bringing your edible abode to life. Preheat your oven to 350°F (175°C) for a balanced heat distribution.
Place the cut-out pieces on parchment paper-lined baking sheets, leaving space between each to prevent sticking.
Bake for 10-12 minutes or until the edges are slightly firm. Be cautious not to over-bake, as a slightly soft texture is preferable.
Keep a watchful eye to ensure even baking, rotating the sheets if necessary. These precise baking instructions lay the groundwork for sturdy yet delectably tender gingerbread components.
Advice on cooling and storing baked pieces before assembly.
Once gingerbread pieces emerge from the oven, grant them respite on the baking sheets.
Allowing the pieces to cool completely is vital for structural integrity. Transfer the cooled components to a wire rack for further cooling and to prevent any residual heat from softening the gingerbread.
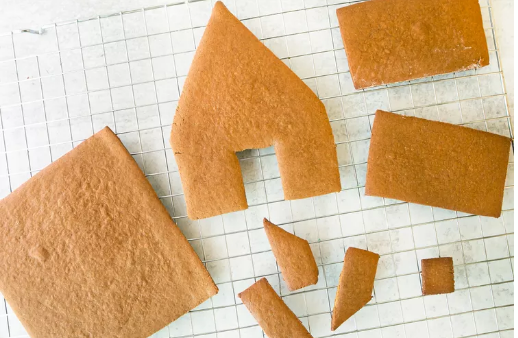
Store the baked pieces in an airtight container at room temperature, ensuring they remain crisp and ready for assembly.
This intentional cooling and storage process sets the stage for the final act of creating a sturdy and visually appealing gingerbread house.
Making the Royal Icing
Step into the sweet realm of artistic mastery as we make the royal icing, the magical adhesive that binds our gingerbread creation.
This section unravels the secrets behind the perfect blend of powdered sugar, meringue powder, and vanilla extract, crafting a versatile icing that serves as glue and canvas.
Recipe and instructions for preparing royal icing.
The crowning jewel of your gingerbread masterpiece, royal icing, is a versatile and essential element for construction and decoration.
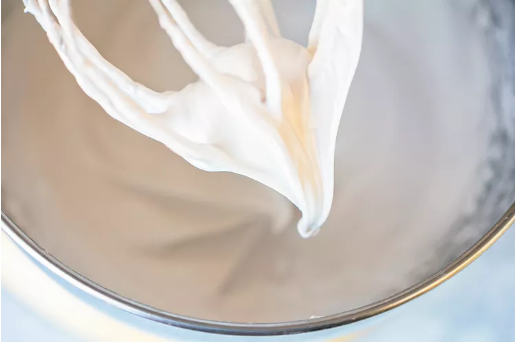
Mix 4 cups of powdered sugar, 3 tablespoons of meringue powder, 1/2 teaspoon of vanilla extract, and 1/2 cup of warm water.
Whip the ingredients at medium speed using an electric mixer until stiff peaks form.
This simple yet sturdy royal icing serves as the glue that binds your gingerbread components together and provides a smooth canvas for your creative expression.
Tips for achieving the right consistency for solid construction.
To ensure the structural integrity of your gingerbread house, achieving the right consistency of royal icing is paramount.
If the icing is too thin, it may not hold the pieces together; piping and decorating become challenging if it’s too thick.
Adjust the consistency by adding more powdered sugar to thicken or a few drops of water to thin. The ideal consistency is when the icing holds its shape but is still pliable enough for easy piping and spreading.
- Start Gradually: When adjusting the consistency of royal icing, add water or powdered sugar gradually to avoid over-thinning or over-thickening the mixture.
- Check Peaks: Whip the icing until stiff peaks form. The peaks should be firm, but the icing should still be pliable for practical construction.
- Test with a Spoon: Dip a spoon into the icing and lift it. The icing should form a smooth, flat ribbon that holds its shape without being too stiff.
- Adjust as Needed: If the icing is too thick, add small amounts of water; if it’s too thin, gradually incorporate more powdered sugar until the desired consistency is reached.
- Be Mindful of Temperature: Royal icing may thicken as it sits, so keep an eye on its consistency and adjust as necessary. A few drops of water can restore the desired texture if it becomes too thick.
Techniques for coloring and flavoring the icing if desired.
Elevate your gingerbread creation by infusing your royal icing with vibrant colors or enticing flavors.
Divide the icing into separate bowls before adding gel food coloring for various hues. To add flavor, consider incorporating extracts such as peppermint or almond.
These personalized touches enhance the visual appeal and contribute to a sensory delight that complements the festive spirit of your edible masterpiece.
Let creativity and precision intertwine as we make royal icing to bring your gingerbread creation to life.
- Divide and Conquer: Split your royal icing into separate bowls before adding color or flavor, allowing versatility in your decorating palette.
- Gel Food Coloring: Opt for gel food coloring over liquid to maintain the icing’s consistency. Start with a small amount and gradually intensify the color as needed.
- Flavorful Extracts: Enhance your icing’s taste by incorporating extracts like peppermint or almond. Begin with a few drops and adjust to taste.
- Mix Thoroughly: Ensure even distribution of color or flavor by mixing the icing thoroughly. A consistent hue and taste contribute to a polished and harmonious finish.
- Experiment with Combinations: Feel free to blend colors or flavors to create a unique and customized palette. A touch of creativity can transform your gingerbread masterpiece into a sensory delight.
Assembling the Gingerbread House
In the grand finale of our gingerbread journey, the art of construction takes center stage as we delve into the intricacies of assembling the gingerbread house.
This section guides light through the sequential steps of creating a sturdy and enchanting structure.
From meticulously securing walls to gracefully attaching roofs, each step is crafted for stability and visual appeal.
Sequential guide to assembling the gingerbread house structure.
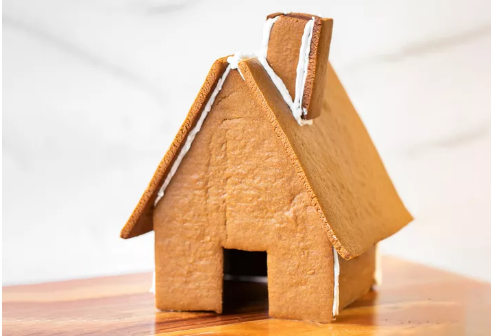
As the culmination of your gingerbread creation approaches, assembling the structure requires precision and patience.
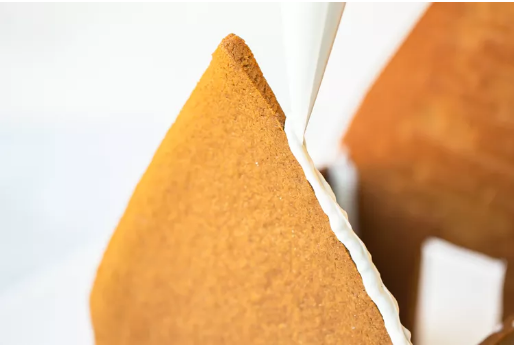
Begin by securing the walls, followed by attaching the roof pieces. Use royal icing as the adhesive, applying it generously along the edges for a firm hold.
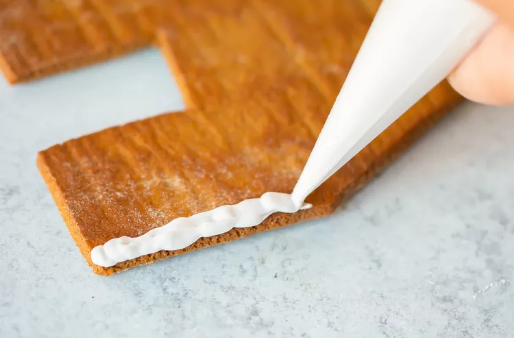
Allow each section to set for a few minutes before moving on to ensure stability. This sequential process provides a sturdy foundation for the decorative elements to come.
Tricks for ensuring stability and preventing collapse.
To safeguard against structural mishaps, employ a few tricks to ensure the stability of your gingerbread house.
Allow the royal icing to set thoroughly between attaching components, providing ample time to harden.
Additionally, consider propping up the walls with cans or other supports until the icing has thoroughly dried.
Patience during the assembly phase is critical to preventing collapses and creating a resilient gingerbread structure.
Ideas for using support structures during assembly if needed.
For added reinforcement during assembly, consider using support structures.
Strategically place cans or tall glasses to support the walls as the icing dries, ensuring the weight is evenly distributed.
Remove these support structures only when the icing has been completely set.
This precautionary measure contributes to the overall stability of your gingerbread house, allowing you to embark on the next enchanting chapter of decoration with confidence.
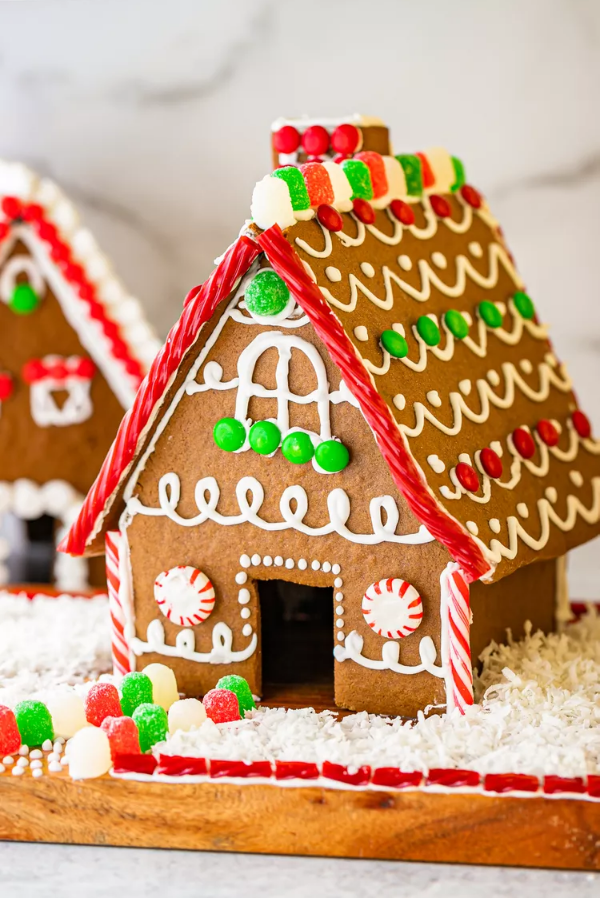
Decorating Your Gingerbread House
With the structure standing proudly, this section invites you to unleash your artistic flair and transform your edible canvas into a masterpiece.
From classic designs to imaginative creations, explore various creative ideas and techniques that will breathe life into your gingerbread abode.

Discover the art of using royal icing to craft snow, icicles, and other enchanting effects, creating a winter wonderland that captures the season’s magic.
Creative ideas and techniques for decorating the house.
With the structure assembled, the canvas is set for the artistic spectacle of decorating your gingerbread house.
Unleash your creativity with a myriad of ideas, from classic to whimsical. Consider creating intricate patterns, festive designs, or replicating a winter wonderland.
Use royal icing as your artistic medium, exploring piping techniques and innovative designs to bring your gingerbread house to life.
Advice on using icing to create snow, icicles, and other effects.
Transform your gingerbread house into a snowy spectacle with the magic of royal icing. Craft delicate snowflakes, icicles, or a blanket of snow on the roof.
Experiment with different icing consistencies for various effects, creating a winter wonderland that captivates the imagination.
Precision is critical as you delicately apply icing to evoke the charm of a frost-kissed gingerbread abode.
Suggestions for arranging candies and other decorative elements.
Elevate the visual feast by strategically arranging candies and decorative elements. From candy cane fences to gumdrop gardens, the possibilities are endless.
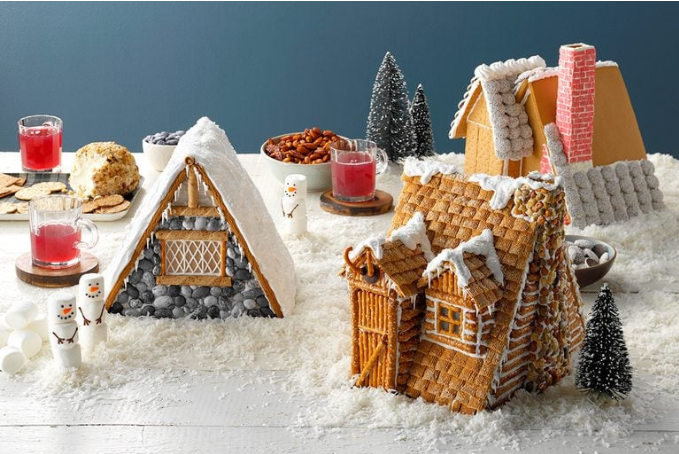
Consider color schemes, textures, and balance as you place each sweet adornment. Let your style shine through, whether it’s a whimsical candy haven or a more refined and elegant design.
The arrangement of candies and decorative elements adds the final flourish, turning your gingerbread house into a delectable work of art that embodies the season’s spirit.
Preservation and Display Tips
As the festive glow continues, this section serves as a guide to prolong the magic of your gingerbread masterpiece with preservation and display insights.
Discover methods to safeguard your creation for extended enjoyment through protective coatings or strategic placement in a controlled environment.
Methods for preserving the gingerbread house for display throughout the season.
Extend the enchantment of your gingerbread creation by exploring effective preservation methods. Consider applying a thin layer of clear lacquer or edible glaze to seal the gingerbread and shield it from humidity.
Placing the gingerbread house under a glass display case or in a relaxed, dry environment can further prolong its display life, allowing your masterpiece to be enjoyed throughout the festive season.
Ideas for incorporating the gingerbread house into holiday decor.
Integrate your gingerbread house seamlessly into your holiday decor, turning it into a centerpiece of festive charm.
Place it as a captivating centerpiece on your dining table, adorn it with miniature holiday lights, or surround it with seasonal greenery.
The gingerbread house can be a delightful addition to your holiday ambiance, seamlessly blending culinary artistry with decorative flair.
Tips on safe storage and handling.
When the time comes to bid farewell to your gingerbread creation, ensure its safe storage for potential future displays.
Wrap the gingerbread house carefully in plastic wrap or place it in an airtight container to shield it from dust and pests. Store it in a cool, dry place to maintain its structural integrity.
When handling, do so gently to prevent breakage or damage. With these tips, your gingerbread house can become a cherished decoration year after year, embodying the enduring joy of the holiday season.
Alternative Ideas and Variations
This section invites you to break free from tradition, suggesting innovative concepts for non-traditional gingerbread structures like castles and landmarks.
Discover gluten-free and allergy-friendly gingerbread recipes for those with dietary considerations that ensure everyone can indulge in the festive sweetness.
Furthermore, find suggestions tailored to engage different age groups in the building process, fostering an atmosphere of enjoyment and collaboration.
Ideas for non-traditional gingerbread structures (castles, landmarks, etc.).
Challenge the conventional with non-traditional gingerbread structures. Consider crafting enchanting castles with turrets and drawbridges or replicating iconic landmarks that evoke a sense of wonder.
From holiday-themed scenes to imaginative creations, venture beyond the ordinary and let your gingerbread architecture reflect boundless creativity.
Gluten-free and allergy-friendly gingerbread recipes.
For those with dietary considerations, savor the holiday spirit with gluten-free and allergy-friendly gingerbread recipes.
Substitute traditional ingredients with gluten-free flour and allergy-safe alternatives, ensuring that everyone can indulge in the warmth and sweetness of gingerbread without compromise.
Suggestions for engaging different age groups in the building process.
Tailor the gingerbread building process to cater to various age groups. For young children, simplify the design with pre-cut shapes and a focus on colorful decorations.
Engage teenagers with more intricate templates and encourage their creativity in decorating.
Foster a sense of inclusivity and enjoyment by adapting the project’s complexity to suit the skills and interests of different participants, making gingerbread construction a delightful activity for all.
Conclusion
The art of gingerbread construction transforms into a delightful and inclusive activity when tailored to cater to various age groups.
For the younger ones, simplicity reigns supreme with pre-cut shapes and a vibrant palette of colorful decorations.
On the other hand, teenagers are invited to delve into the intricacies of more elaborate templates, unleashing their creativity in the decorating phase.
By adapting the complexity of the project to align with the skills and interests of each participant, a sense of inclusivity and enjoyment permeates the gingerbread-building experience.